Google Cloud Setup and Tutorial
This is a guide for setting up Google Cloud Engine for the course. Most of this is directly lifted from the original course guide, but this is intended to be a standalone guide. We realize people come from different backgrounds and we are here to help those who might have difficulties with getting everything up and running. Feel free to talk to us after class and/or use the Facebook group
MDLI #3 Intro
updated Jan2020
Before We Begin: Credits/Stopping Your Instances
Google (and the wonderful Naama) was nice enough to provide each one of you with 1000$ worth of Google Cloud Platform (GCP from now on) credits. This might sound like a lot, but in reality it actually isn’t that much. The most important thing to remember during this course - and when working with cloud instances in general - is top stop them when unused. I’ll repeat this;
#when you are not using an instance - stop it
Creating/Setting Up Your Google Account
We assume you have GMail/Google Accounts. If you don’t - this is a good time to create one. Google accounts give you access to many services, one of which is the GCP (and inside that, the Google Compute Engine/GCE - which is what we’ll be using).
Getting your Credits
If this is indeed your first time you should receive some free trial credits from Google, so those should suffice for the purpose of this guide (we will only waste very few of those, promise!).
The place where magical, free credits exist is Will be updated. You will naturally only receive credits if you are part of this course.
You should enter only using the email address associated with the Google account you will be using!. For Contact Name enter your name. As for the GCP Billing Account ID - we’ll get there soon, so hold on tight.
BEFORE WE BEGIN
BIG REMINDER: Make sure you stop your instances!
(We know you won’t read until the very bottom once your assignment is running, so we are printing this at the top too since it is super important)
Don’t forget to stop your instance when you are done (by clicking on the stop button at the top of the page showing your instances), otherwise you will run out of credits and that will be very sad. :(
If you follow our instructions below correctly, you should be able to restart your instance and the downloaded software will still be available.
Create and Configure Your Account
For the class project and assignments, we offer an option to use Google Compute Engine for developing and testing your implementations. This tutorial lists the necessary steps of working on the assignments using Google Cloud. We expect this tutorial to take about an hour. Don’t get intimidated by the steps, we tried to make the tutorial detailed so that you are less likely to get stuck on a particular step. If you have any questions your are welcome to approach any of us on the dedicated Facebook group.
This tutorial goes through how to set up your own Google Compute Engine (GCE) instance to work on the assignments. Each student will have $1000 in credit throughout the course, thanks to Google Israel’s generousity. When you sign up for the first time, you also receive $300 credits from Google by default. Please try to use the resources judiciously. We don’t expect you to use up all the trial credits on the course, and the additional sum will be handed to everyone shortly.
First, if you don’t have a Google Cloud account already, create one by going to the Google Cloud homepage and clicking on Compute. When you get to the next page, click on the blue TRY IT FREE button. If you are not logged into gmail, you will see a page that looks like the one below. Sign into your gmail account or create a new one if you do not already have an account.
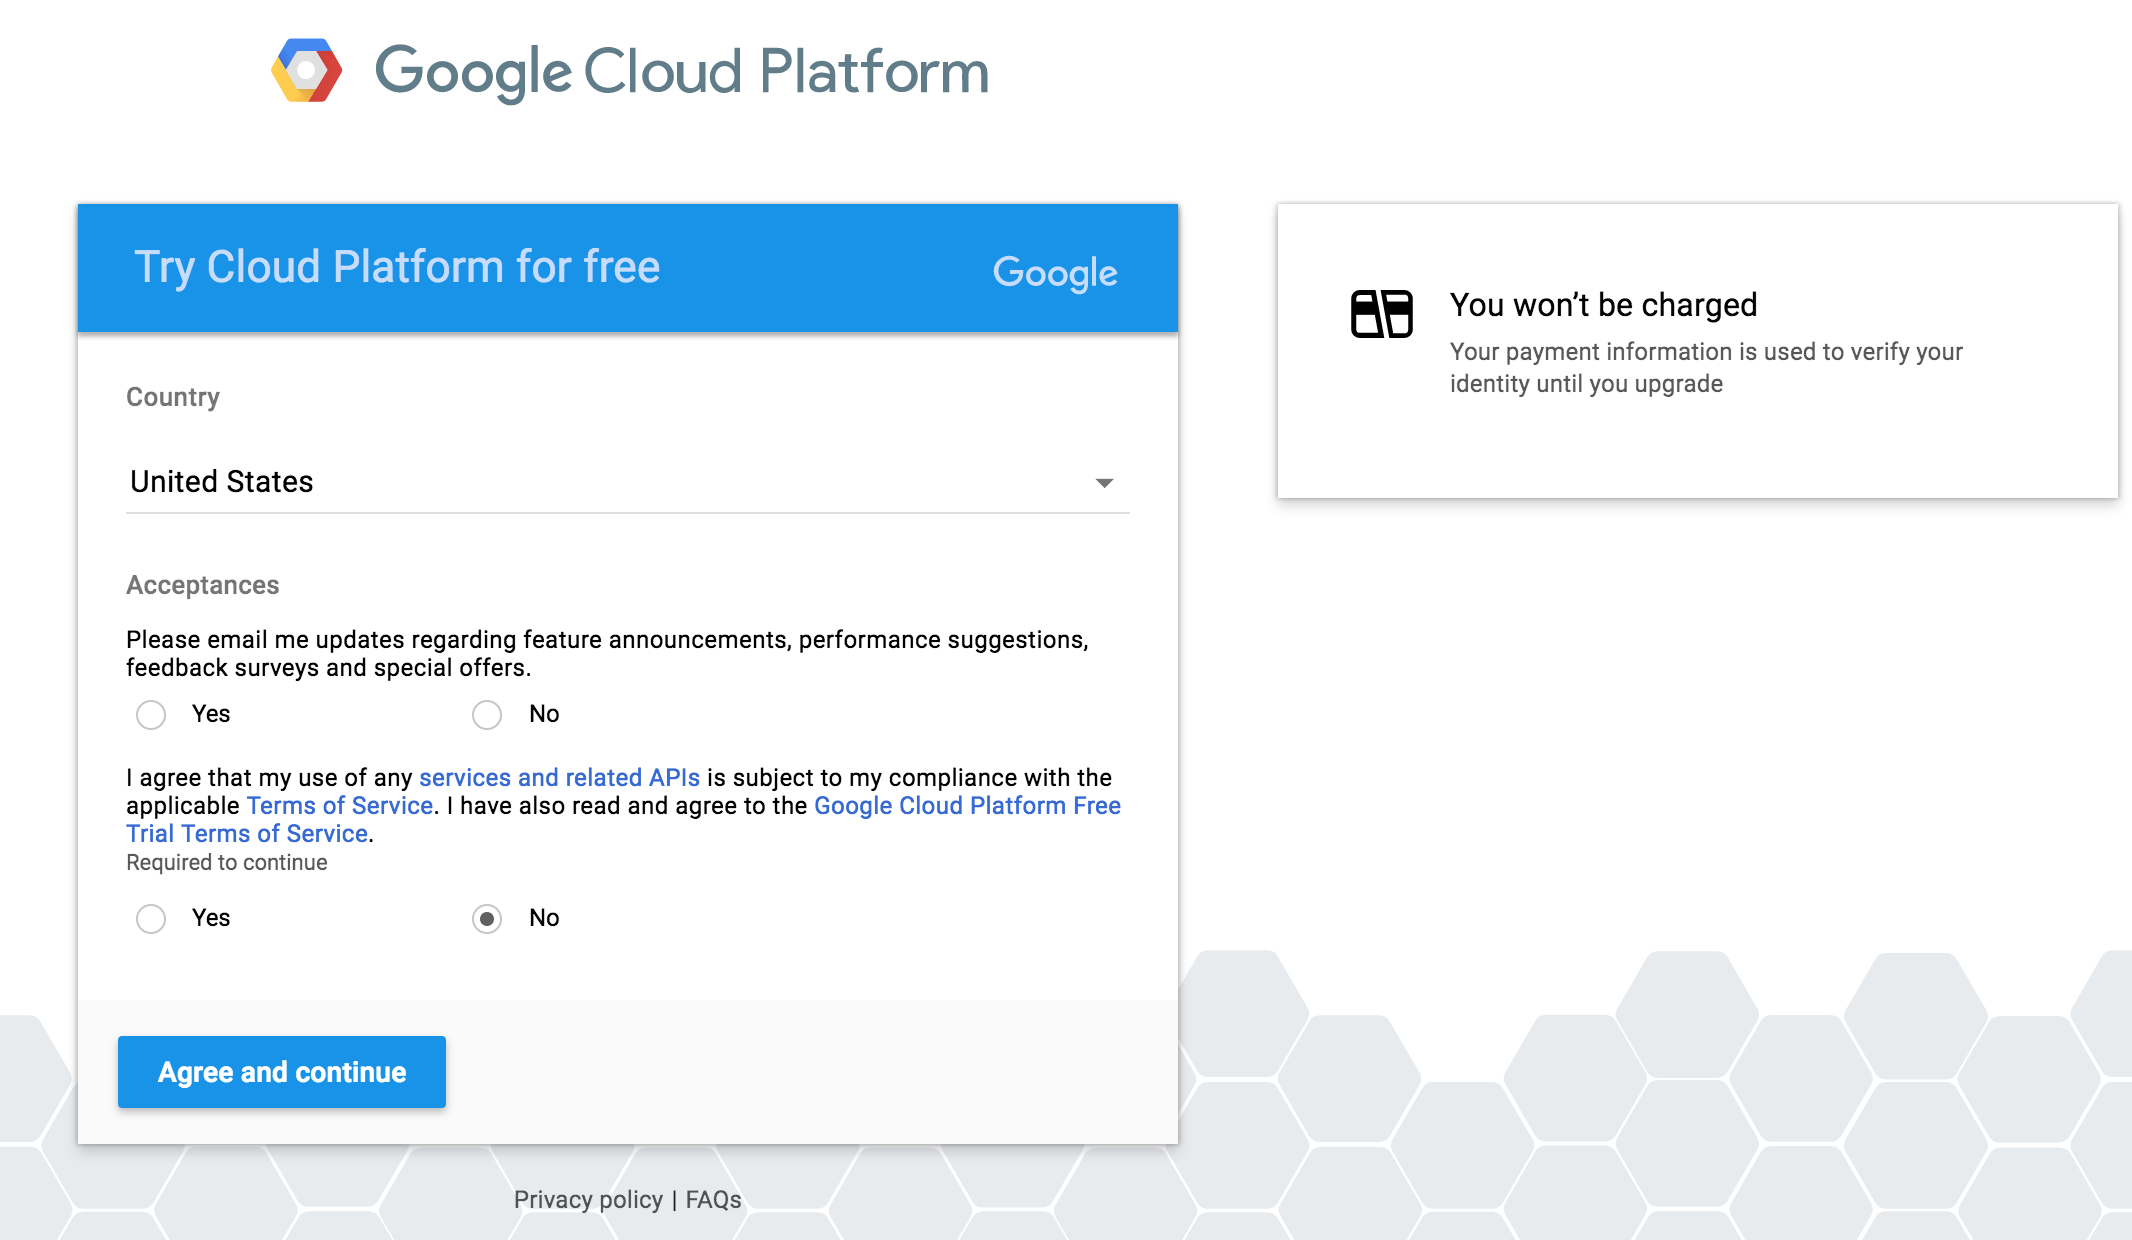
Click the appropriate yes or no button for the first option, and check yes for the second option after you have read the required agreements. Press the blue Agree and continue button to continue to the next page to enter the requested information (your name, billing address and credit card information). Remember to select “Individual” as “Account Type”:
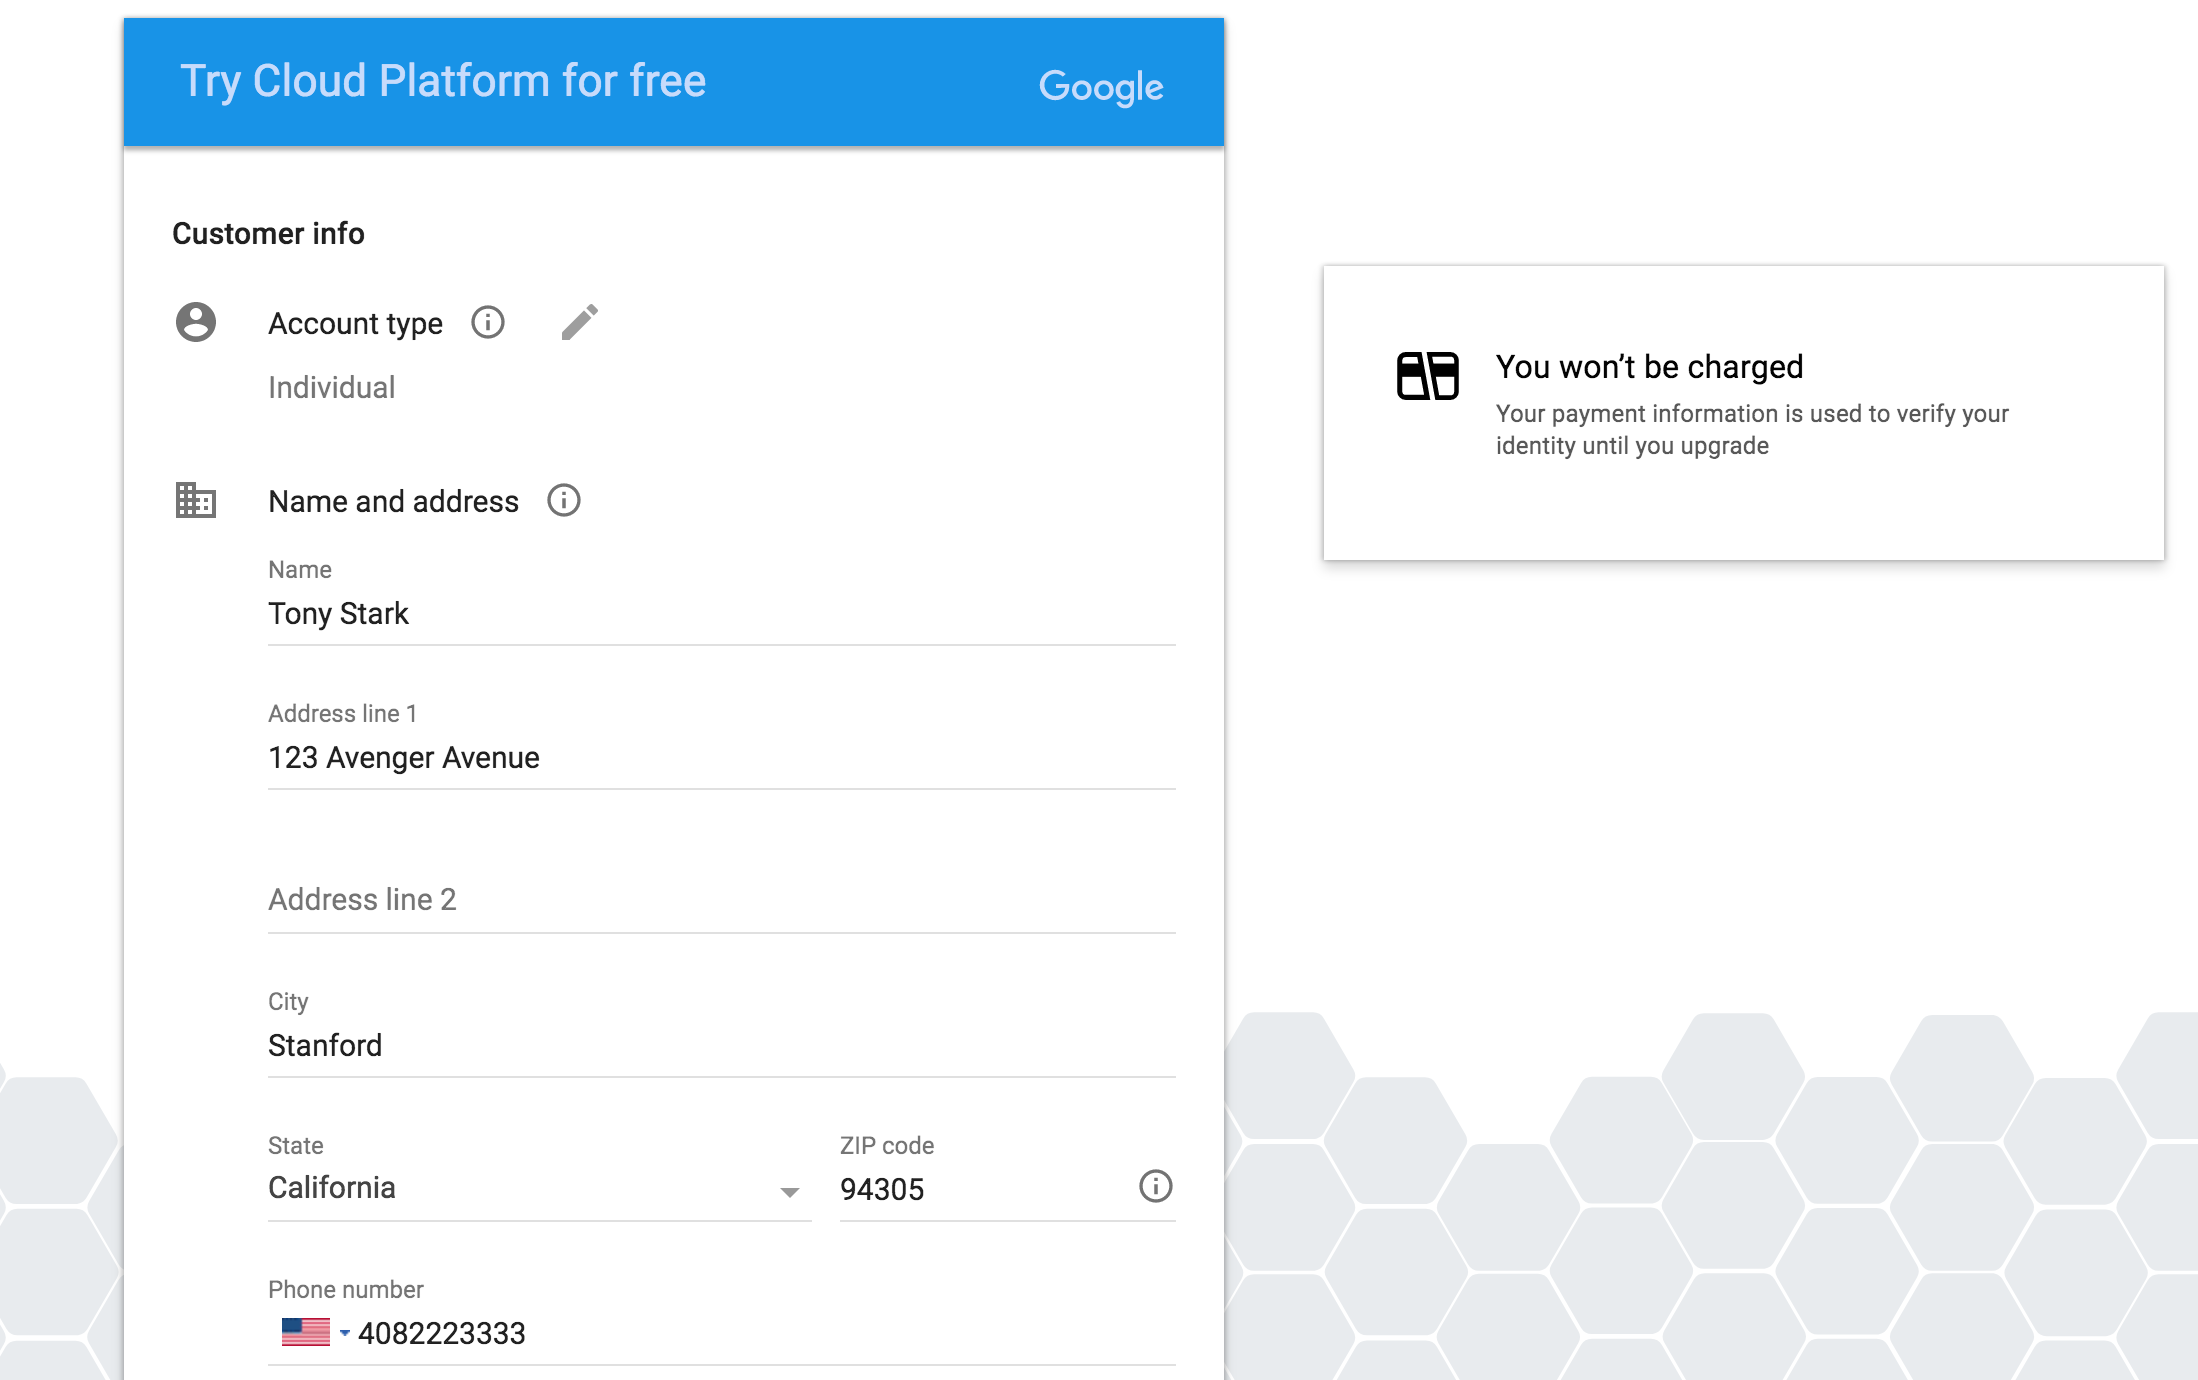
Once you have entered the required information, press the blue Start my free trial button. You will be greeted by a page like this:
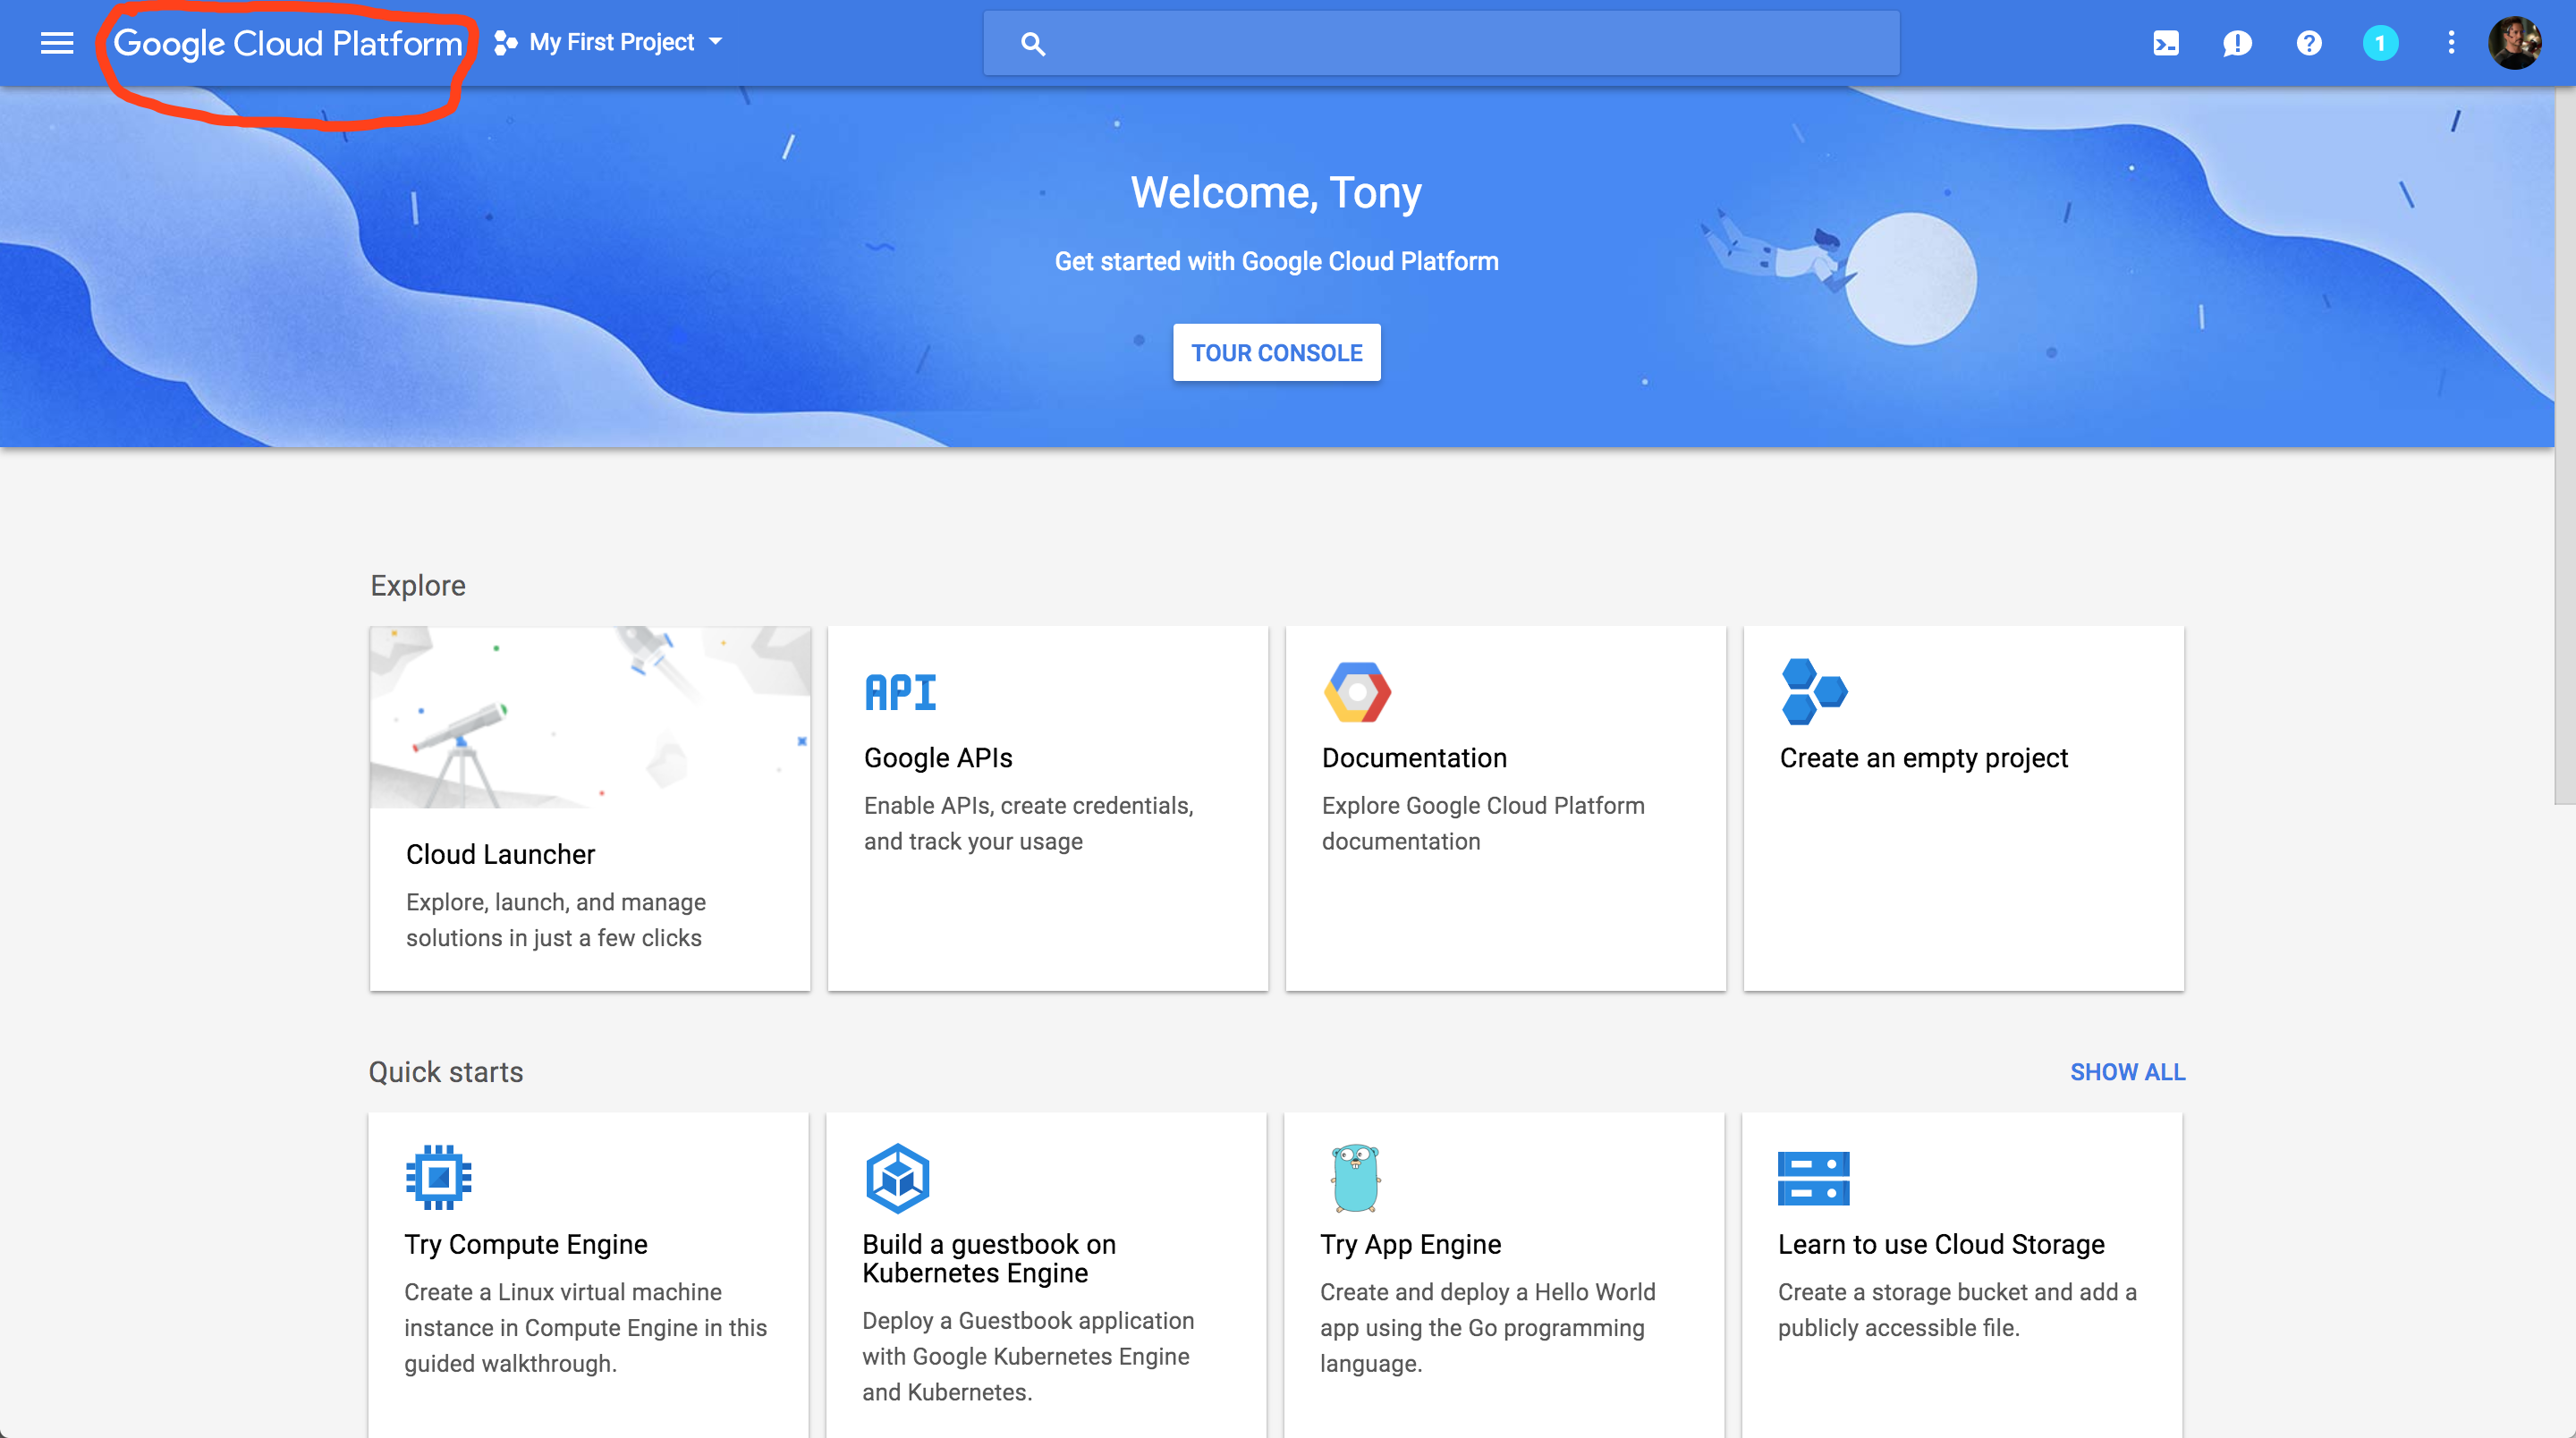
Click the “Google Cloud Platform” (in red circle), and it will take you to the main dashboard:
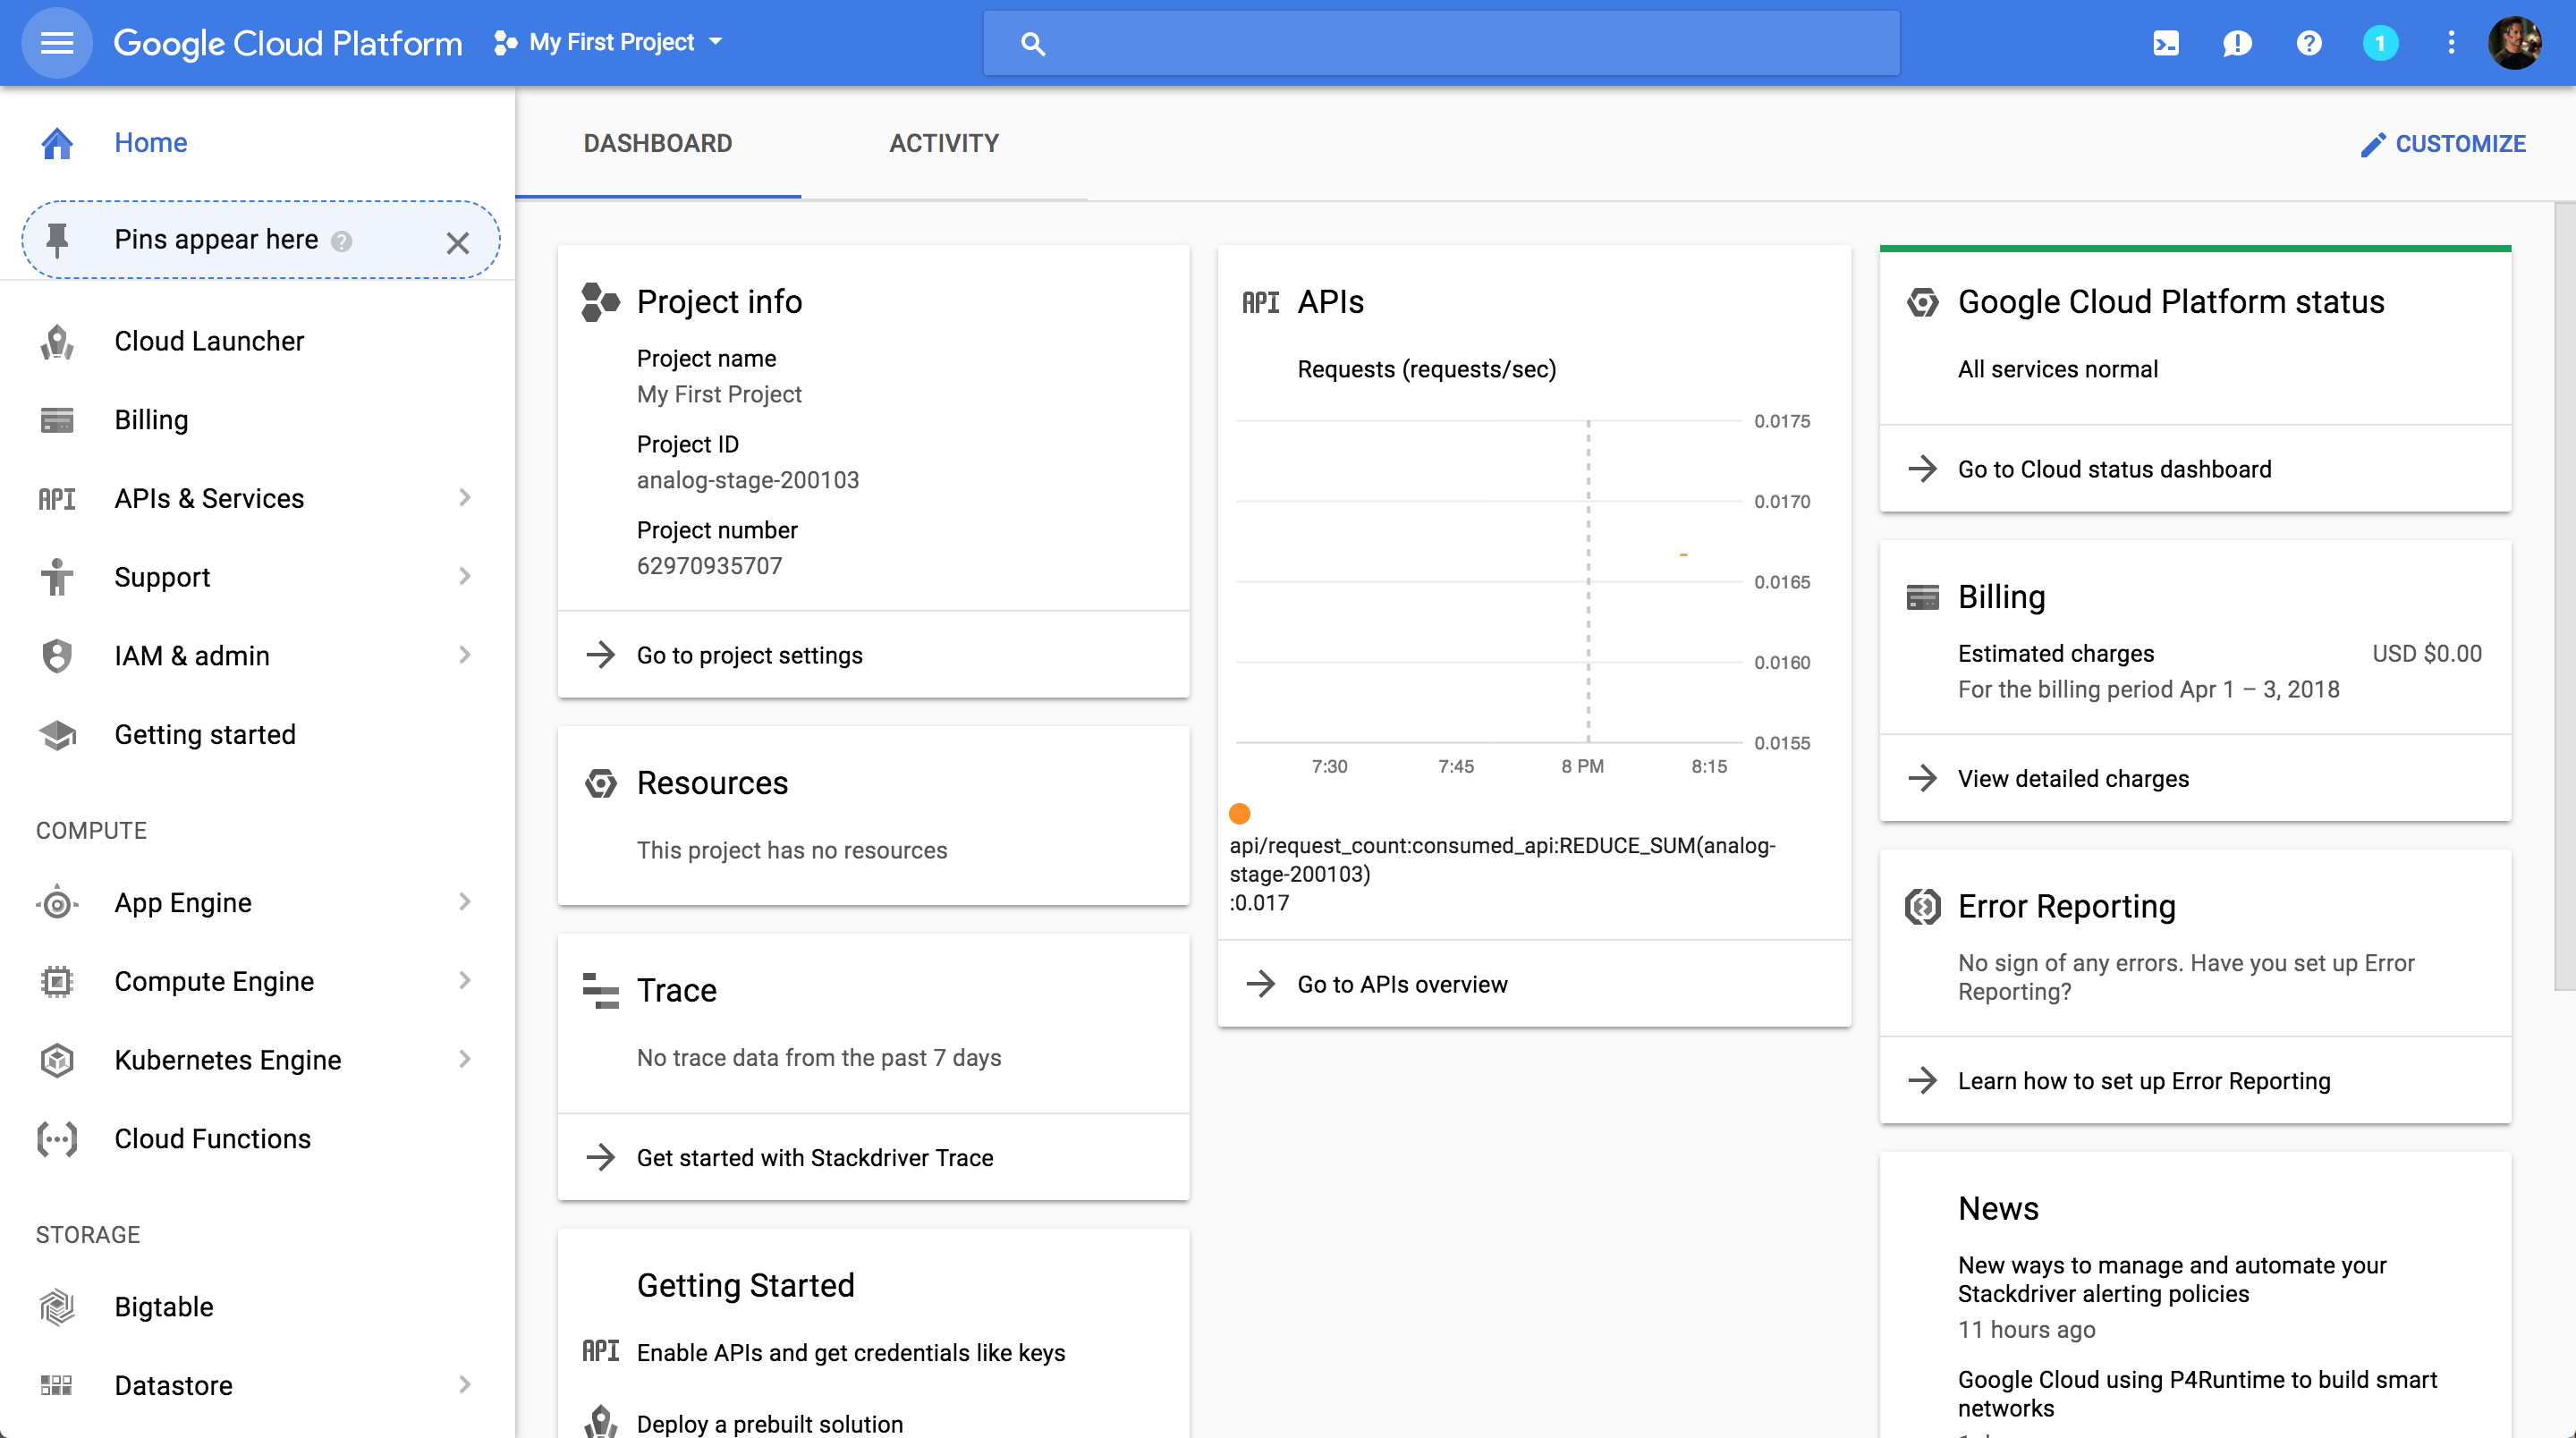
To change the name of your project, click on Go to project settings under the Project info section.
Request an increase in GPU quota
Your account typically does not come with GPU quota. You have to explicitly request for it under IAM Admin > Quotas. Follow our instructions here
Google Cloud VM Image
Configuring Instnace
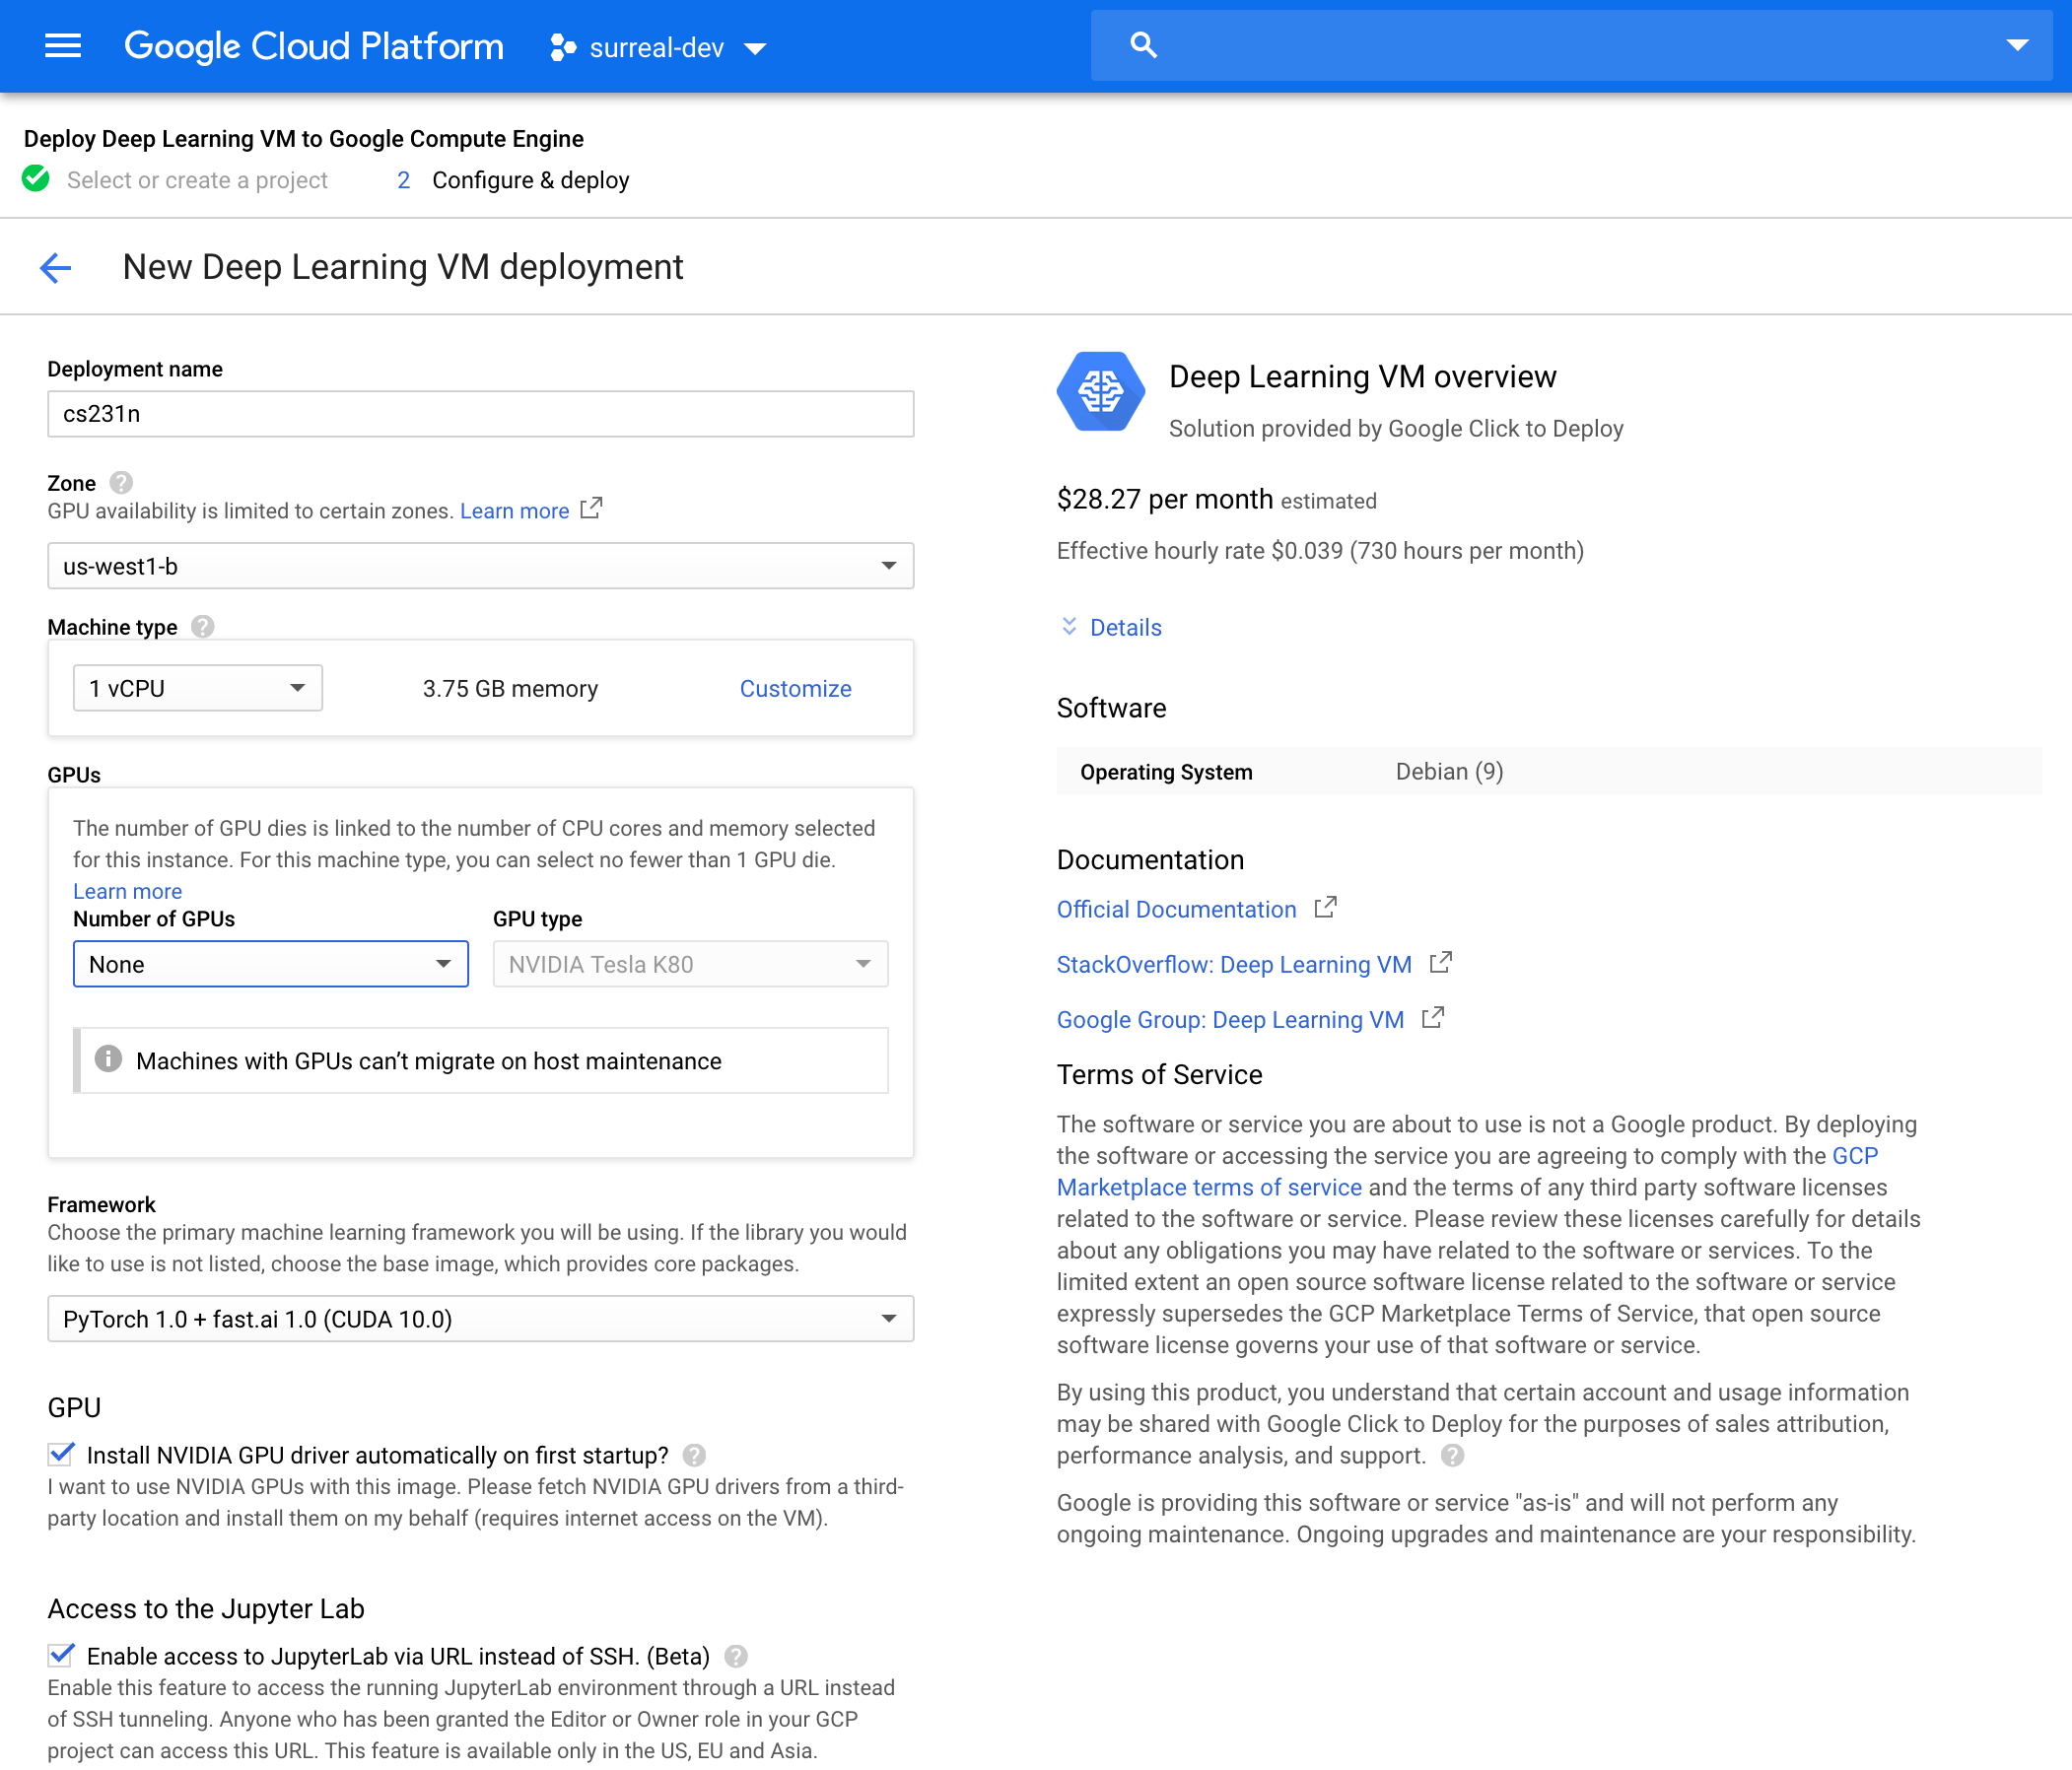
- Go to this gcloud marketplace. You may (or may not) be taken to a page where you have to click on “Launch in Compute Engine”, and then you should see a configuration sheet with the title “New Deep Learning VM deployment”.
- Fill in
Deployment namefield with your preferred VM name. - In
Machine typefield, change2 vCPUsto1 vCPU. You can always add more CPUs later if necessary. - In
GPUsfield, you can follow one of the two paths:- (a) If you have successfully requested GPU quota, you should set
Number of GPUsto1. GPU drivers and CUDA will be automatically installed only if you select at least 1 GPU. For our first assignment, you don’t need GPUs. Since GPUs are very expensive, you can add them back when they become necessary later. - (b) If you don’t have GPU quota yet, you must set
Number of GPUstoNone. WARNING: GPU drivers and CUDA will NOT be installed. All libraries will be CPU only. Once your GPU quota increase request is approved, you can follow path (a) to deploy a GPU-enabled image.
- (a) If you have successfully requested GPU quota, you should set
- In
Frameworksfield, changeTensorFlow 1.13 (Intel optimized ...)toPyTorch 1.0 + fast.ai. We will have instructions for you later if you want Tensorflow. - Check the box
Install NVIDIA GPU driver automatically on first startup?. - Check the box
Enable access to JupyterLab via URL instead of SSH. (Beta). - Leave all other options as default.
- Click the blue botton
Deployat the end of the page.
Your configuration sheet should look similar to below:
Deploying Instnace
Finally, you can hit the blue deploy button at the bottom of the page. You should see a deployment screen similar to this one below, which will probably take a while to properly finish.
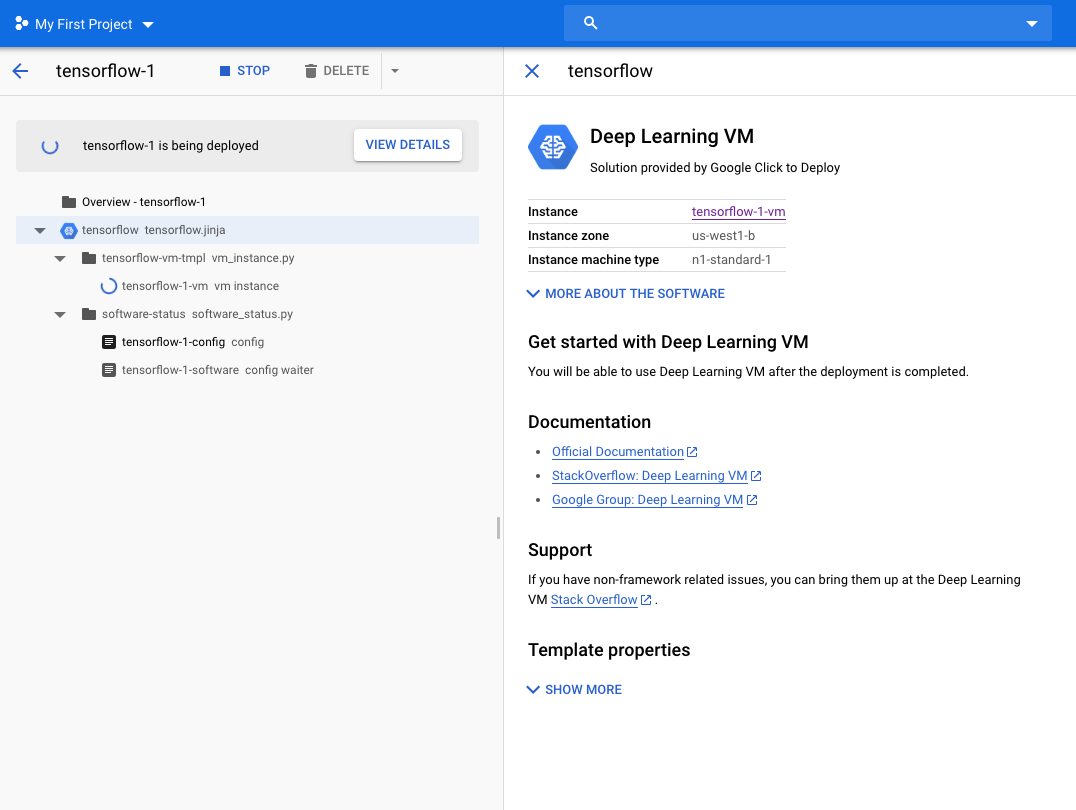
You should see a running VM with a green checkmark next to it on your Compute Engine page.
I didn’t give it a new name, but you might want to do that. Note that the instnace is now running!
Change VM hardware
One of the cooler features of GCP is that you can always change number of CPUs, number of GPUs, CPU memory, and GPU type after your VM has been created.
- You must stop the instance first.
- Go to your VM instance’s details at Compute Engine > VM instances > [click on instance name]. Click “edit” on your VM’s page.
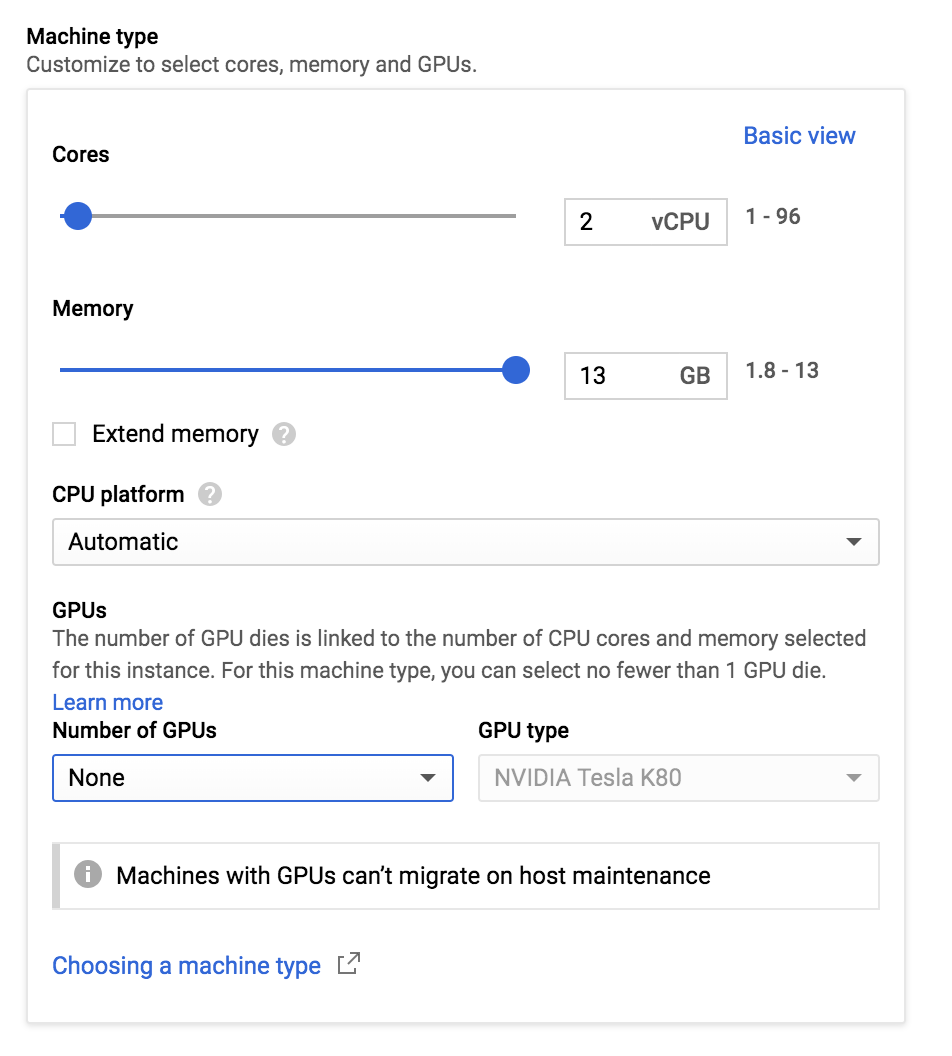
- In
Machine typebox, clickCustomize. - Set
Number of GPUstoNoneif you don’t need GPUs. - For
GPU type,NVIDIA Tesla K80is typically enough for most of our assignments.P100andV100are way more expensive, but also faster. - Scroll all the way down and click
Savebutton. - Start your instance again.
Configure networking
We need to tweak a few more settings to enable remote access to Jupyter notebooks.
- You must stop the instance first.
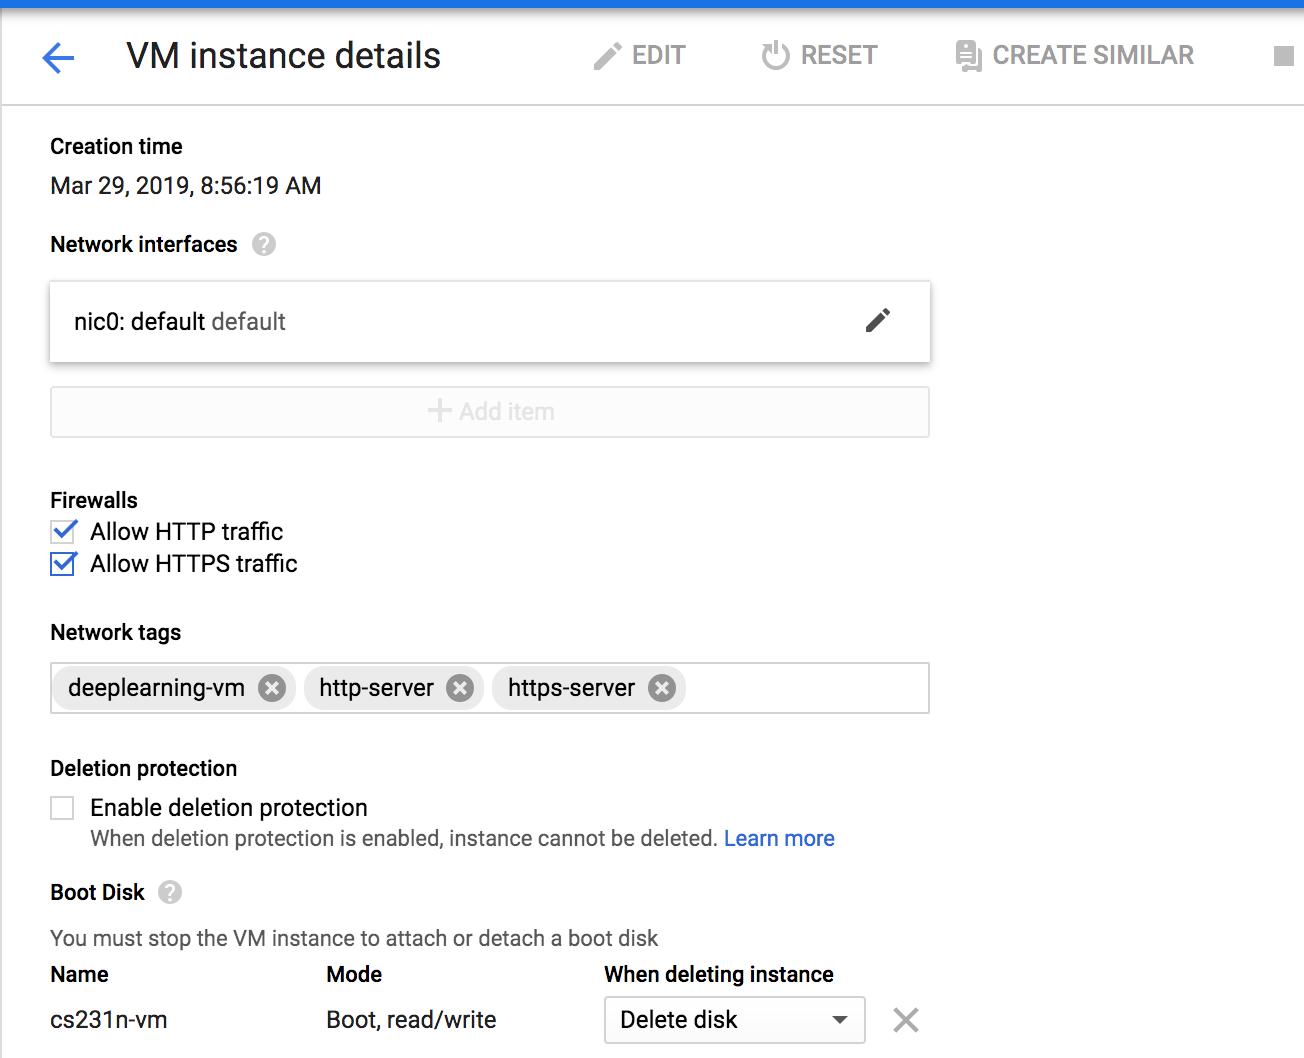
- Go to your VM instance’s details at Compute Engine > VM instances > [click on instance name]. Click “edit” on your VM’s page.
- Select “Allow HTTP traffic” and “Allow HTTPS traffic”.
- Scroll all the way down and click the blue button “save”.
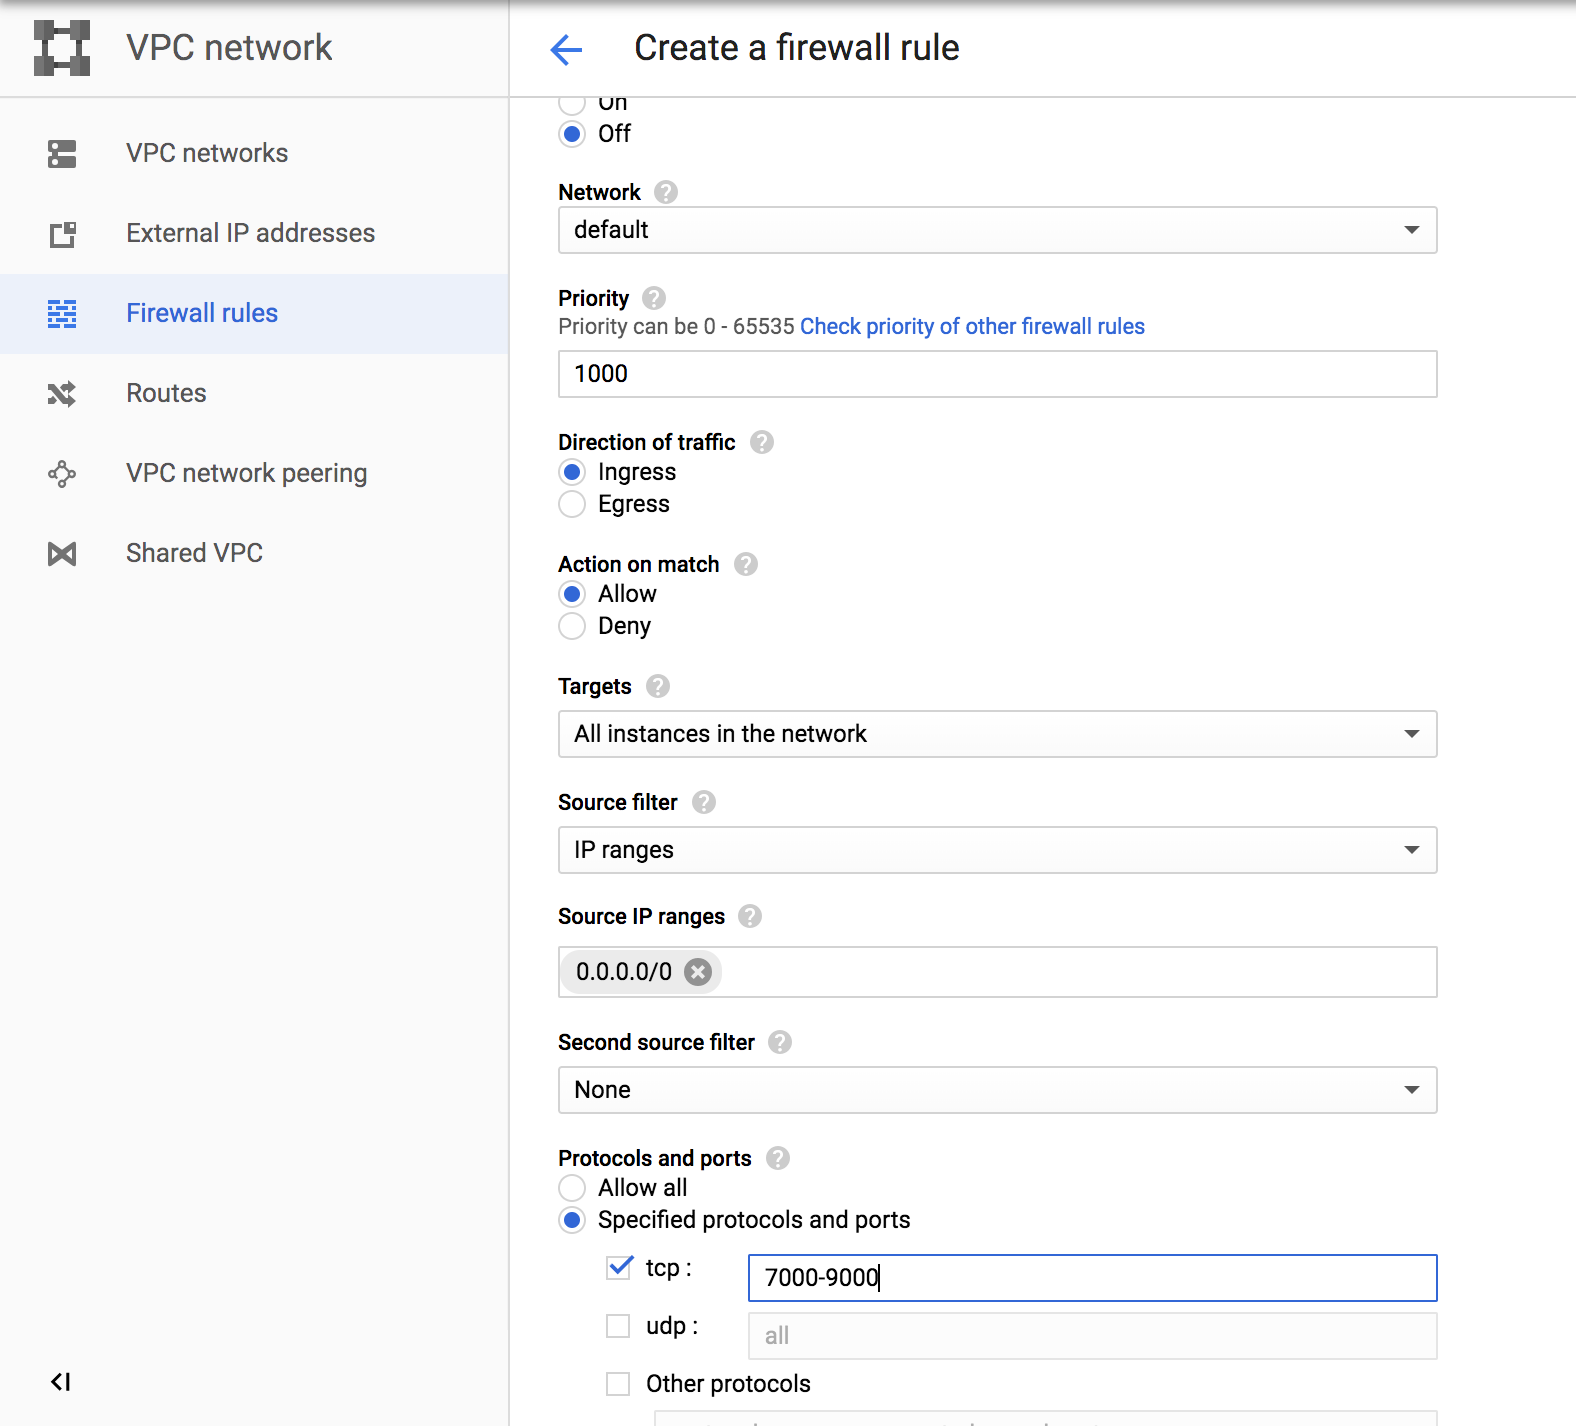
- Go to Firewall config page.
- Click “CREATE FIREWALL RULE”
- Give it an arbitrary name, such as
cs231n. - In
Targetsfield, selectAll instances in the network. - In
Source IP ranges, enter0.0.0.0/0. - In
Protocols and portsfield, select “Specified protocols and ports”. Then checktcpand enter7000-9000. - Click the blue button
Create. - Restart your instance on the Compute Engine page.
Your configuration sheets should look similar to below:
-
 -
-
Firewall Rules:
-
 -
-
Access your newly created VM
Now that you have created your virtual GCE, you want to be able to connect to it from your computer. The rest of this tutorial goes over how to do that using the command line. First, download the Google Cloud SDK that is appropriate for your platform from here and follow their installation instructions. NOTE: this tutorial assumes that you have performed step #4 on the website which they list as optional. When prompted, make sure you select us-west1-b as the time zone.
If gcloud command is not in system path, you can also reference it by its full path /<DIRECTORY-WHERE-GOOGLE-CLOUD-IS-INSTALLED>/bin/gcloud. See this page for more detailed instructions.
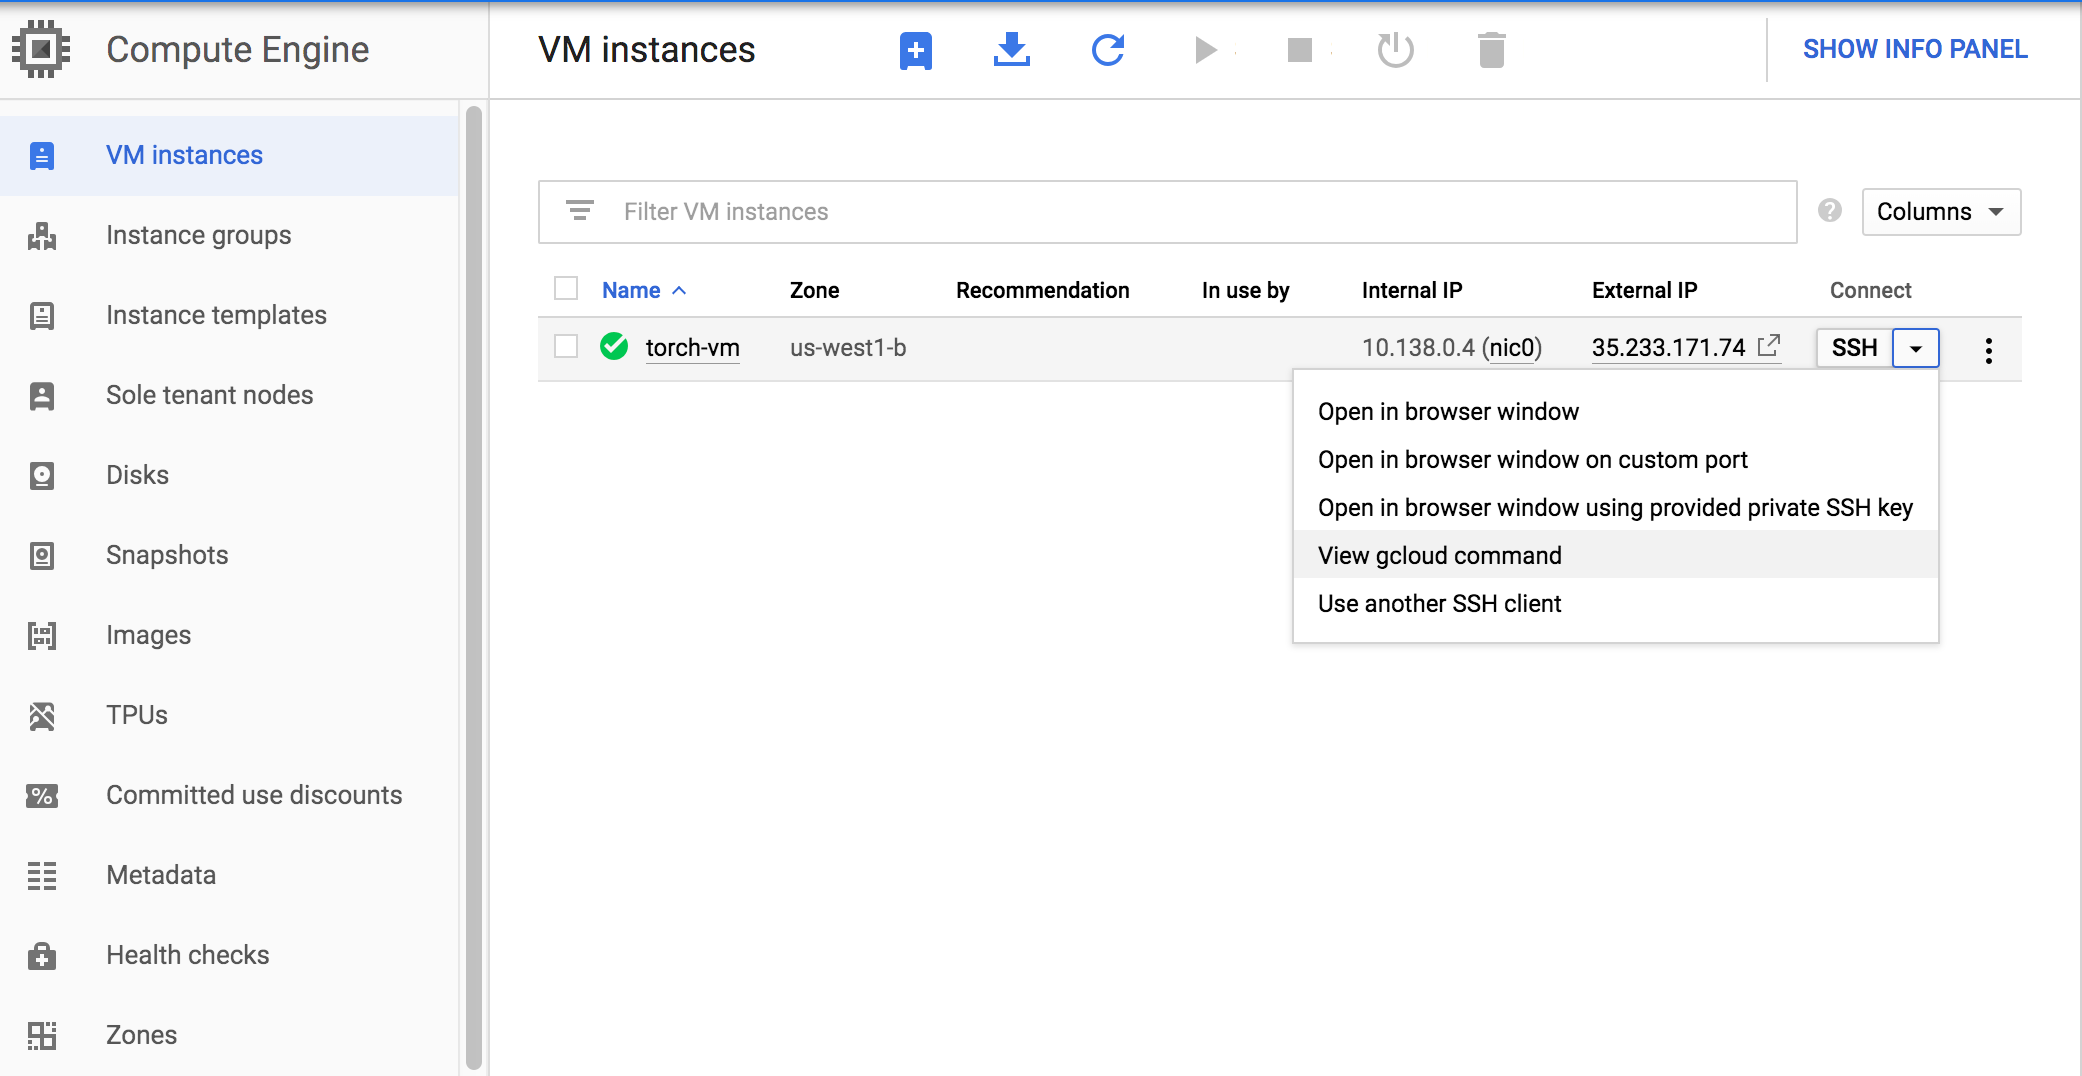
To ssh into your VM, go to your VM instance details page by clicking on its name. Under Remote access at the top of the page, you may either click directly on SSH which will launch a new browser window with the SSH session, or click on the drop-down arrow and select View gcloud command instead to retrieve the terminal command. It should look like
gcloud compute --project "<YOUR_PROJECT_ID>" ssh --zone "us-west1-b" "<YOUR_VM_NAME>"
Authentication
Note, you might be requried to authenticate first. Do this by invoking:
gcloud auth login
…which will take you into an authentication page. The command will also create a link which you can copy and paste into a browser window if that doesn’t happen automatically. This will give the cgloud CLI (command line interface) access to your Google account.
After you SSH into the VM for the first time, you need to run a few commands in your home directory. You will be asked to set up a password for your Jupyter notebook.
First-time Setup Script
Double-check that you are inside your isntance rather than in your own person machine. A good way to verify is the hostname command
git clone https://github.com/nirbenz/gcloud.git
cd gcloud/
chmod +x ./setup.sh
./setup.sh
Verification
If you have GPU enabled, you should be able to:
- run
nvidia-smiand see the list of attached GPUs and their usage statistics. Runwatch nvidia-smito monitor your GPU usage in real time. - inside the
gcloud/folder, runpython verify_gpu.py. If your GPU is attached and CUDA is correctly installed, you shouldn’t see any error. - If you want to use Tensorflow 2.0, run
python test_tf.py. The script will show you the installed Tensorflow version (2.0.0-alpha) and then run a sample MNIST training. You should see around 0.9801 accuracy at the end.
If script fails
The script occasionally fails due to CUDA version mismatch. Something along the lines of:
ImportError: libcublas.so.10.0: cannot open shared object file: No such file or directory
If this happens, you need to update your TF version to ==2.0.0 from the script’s default 2.0.0a. The script has been since updated, but verify you are running the right version just in case by invkoking:
pip install tensorflow-gpu==2.0.0
Also, this command:
nvidia-smi
Should display
| NVIDIA-SMI 418.67 Driver Version: 418.67 CUDA Version: 10.1 |
If you see another CUDA version, let us know, but first make sure you have followed the guide exactly as is shown - specifically in the instance creation part (did you change to the fast-ai image?). Many other failure cases could happen, but I tried to fix them all in the updated script. Contact us directly it other things fail.
Using Jupyter Notebook with Google Compute Engine
Many of the assignments will involve using Jupyter Notebook. Below, we discuss how to run Jupyter Notebook from your GCE instance and connect to it with your local browser.
Getting a Static IP Address
Change the External IP address of your Google Cloud Engine instance to be static (see screenshot below).
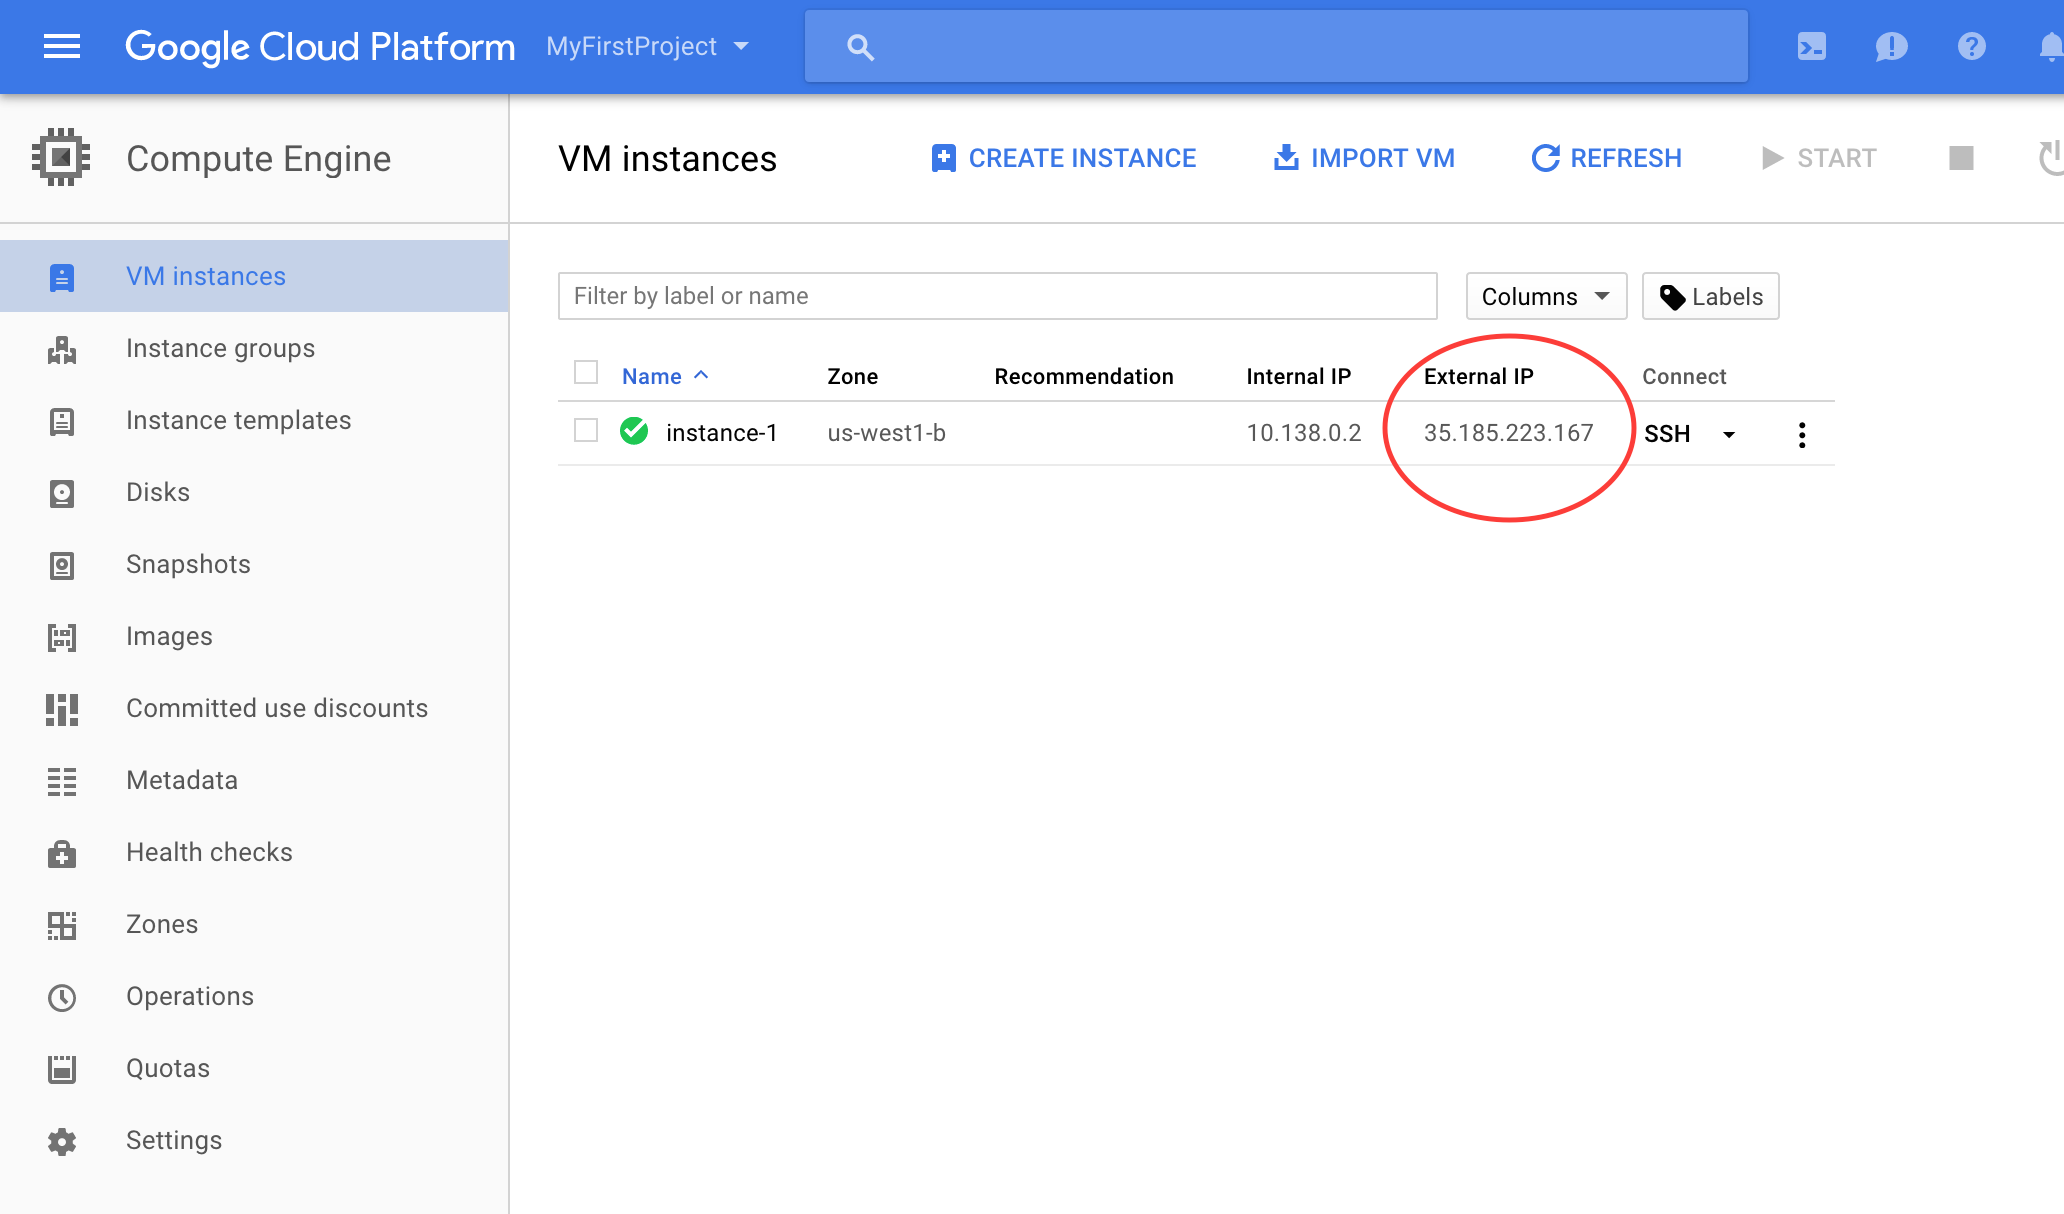
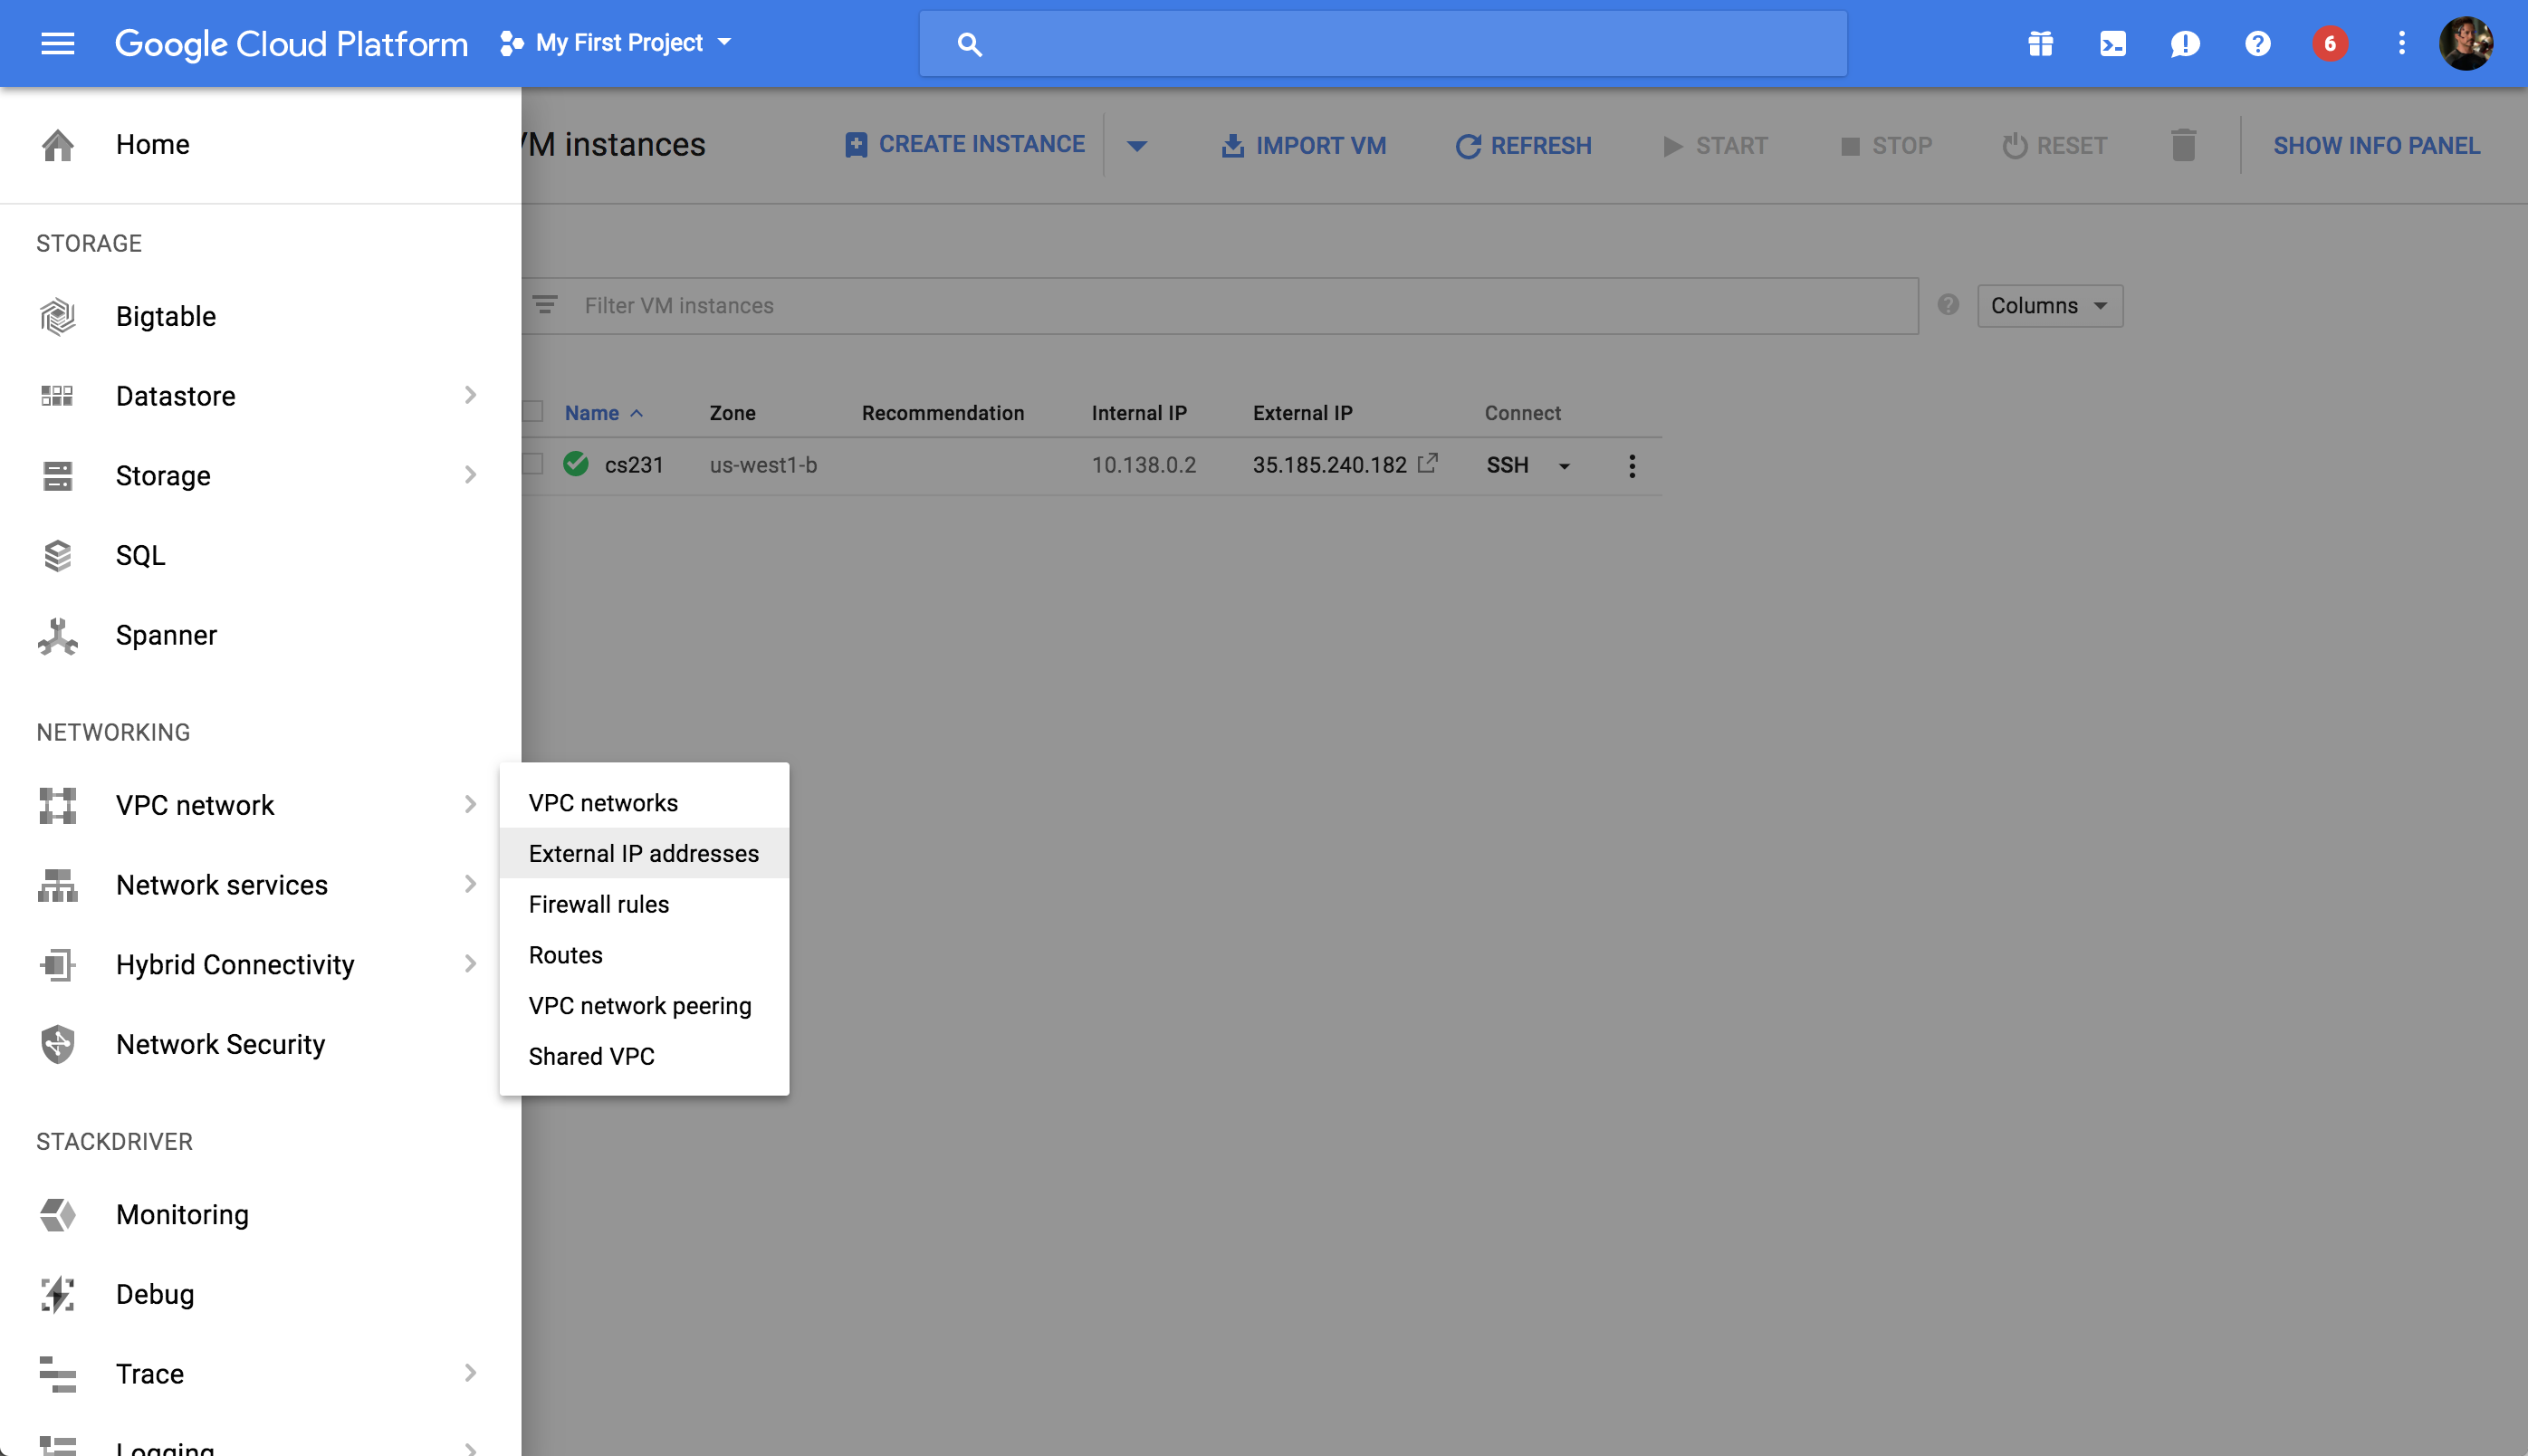
To Do this, click on the 3 line icon next to the Google Cloud Platform button on the top left corner of your screen, go to VPC network > External IP addresses (see screenshot below).
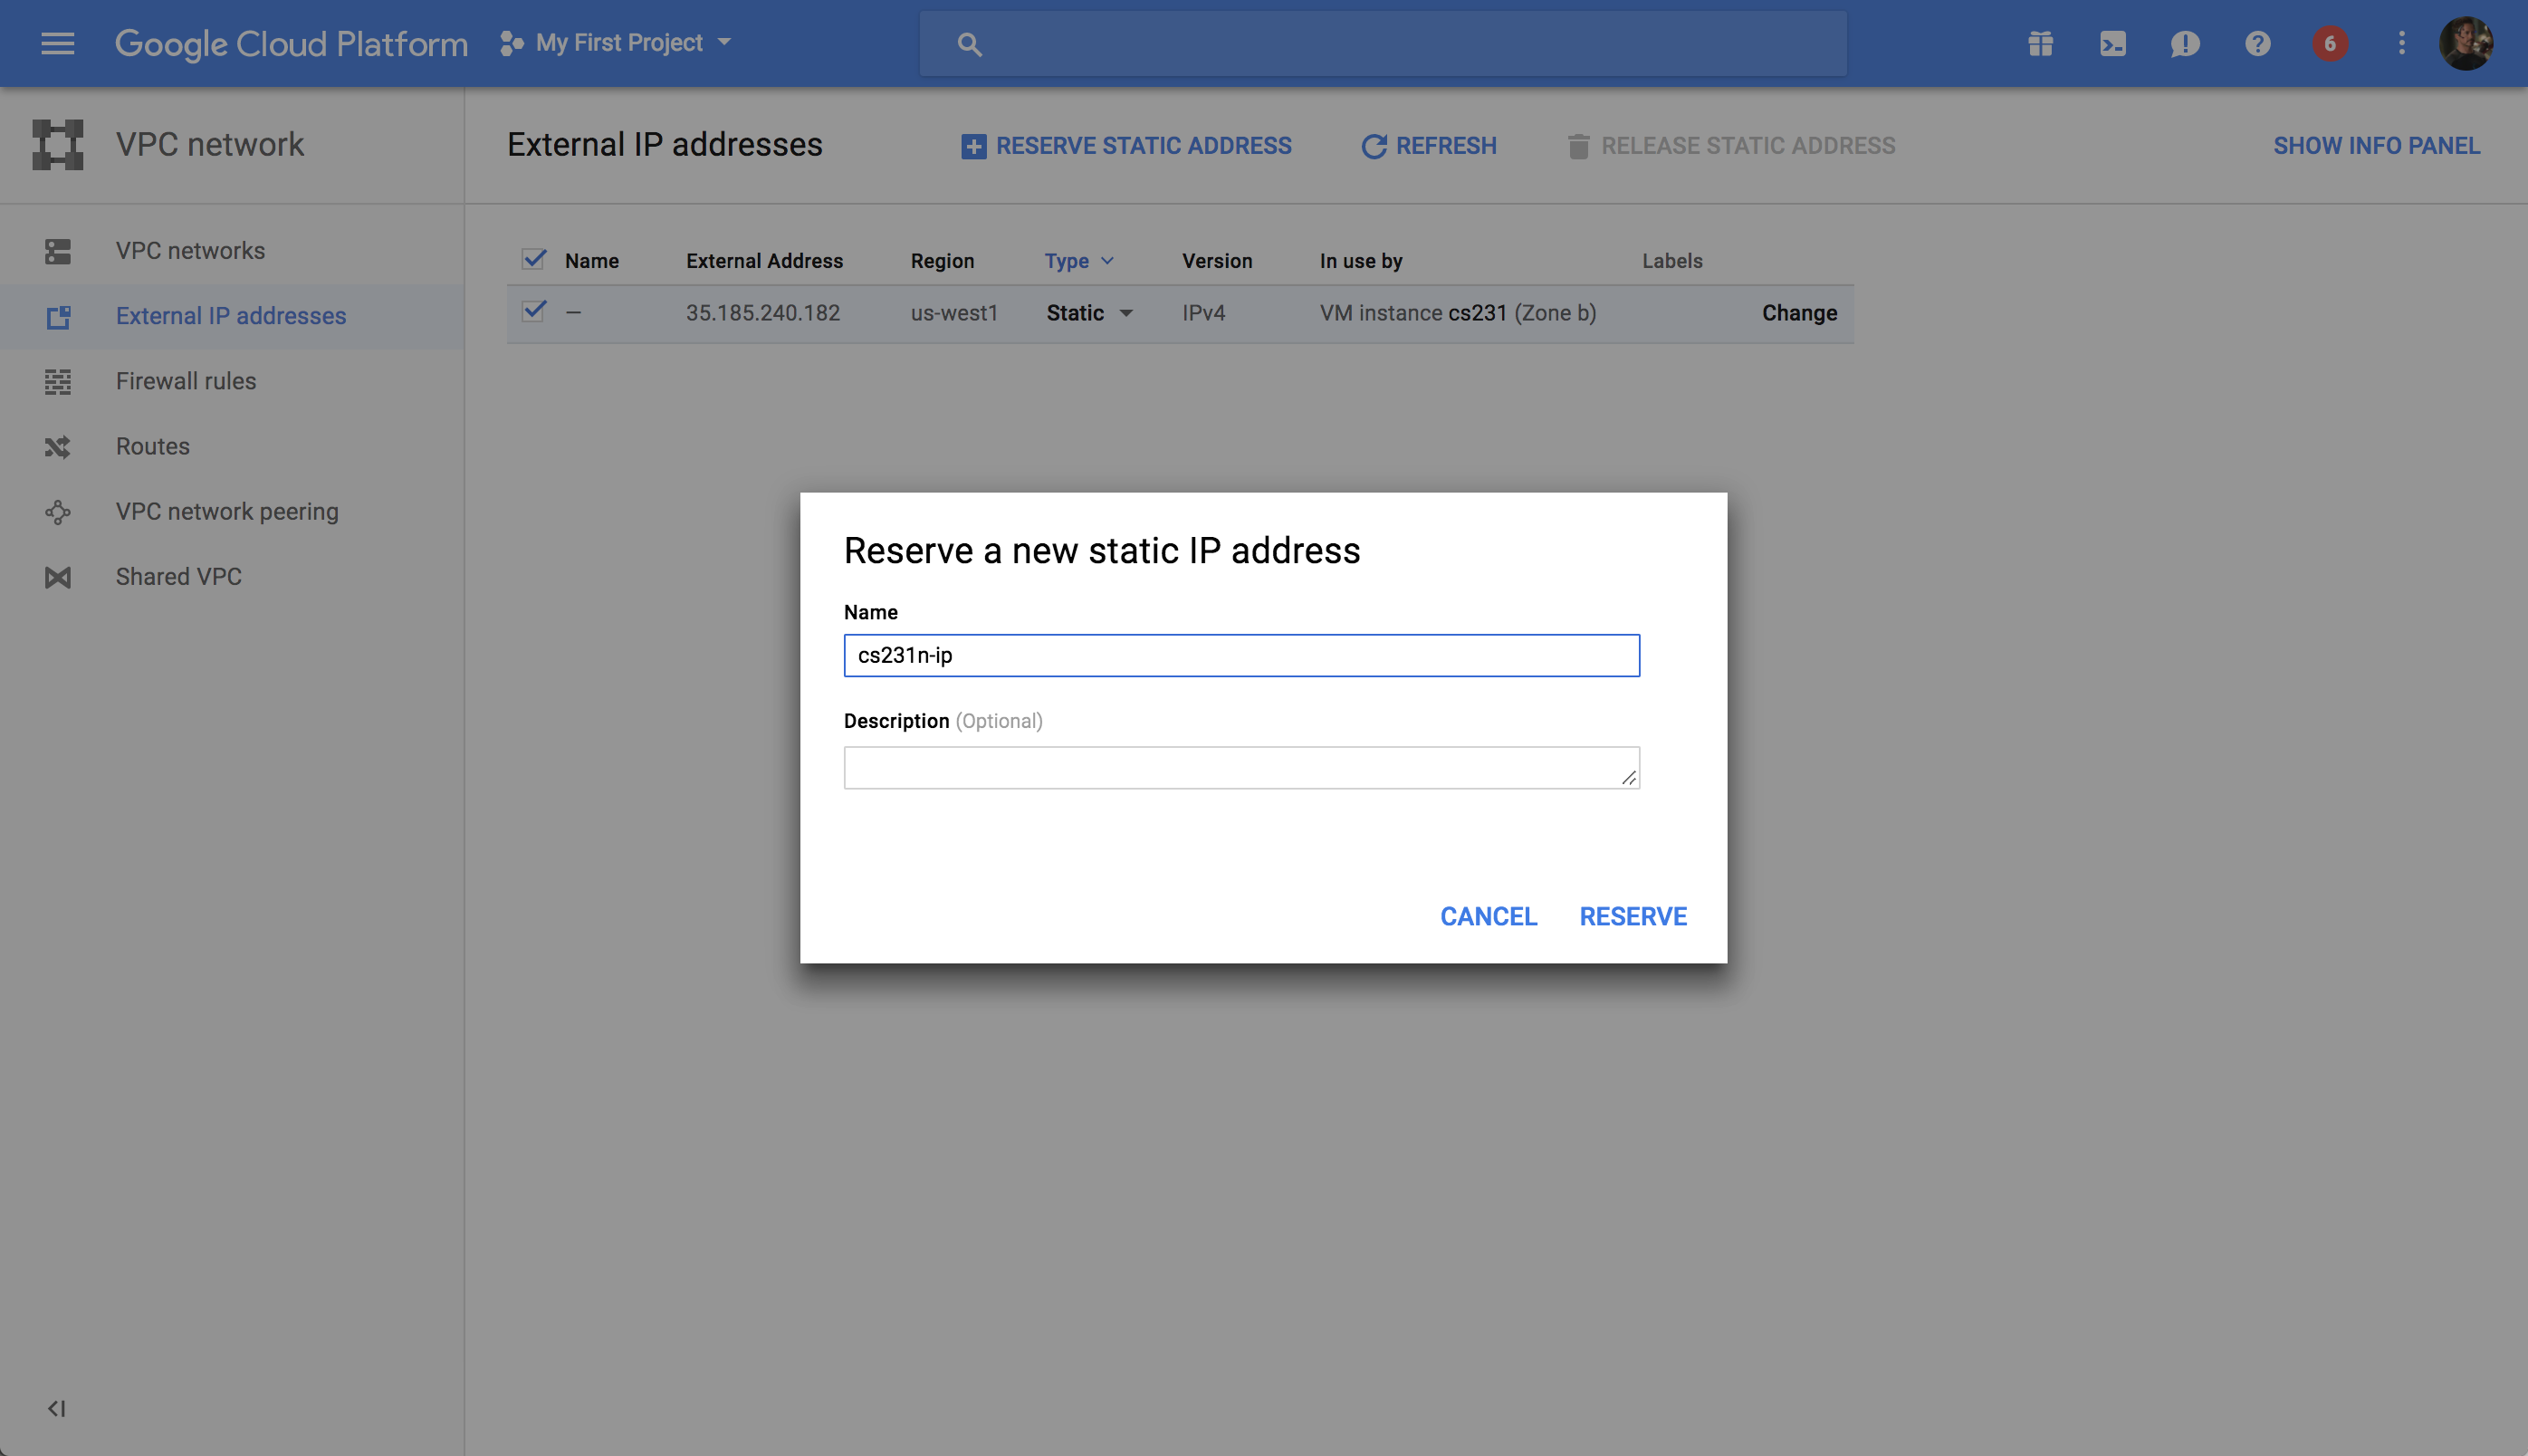
To have a static IP address, change Type from Ephemeral to Static. Enter your prefered name for your static IP, ours is cs231n-ip (see screenshot below). And click on Reserve.
NOTE: At the end of CS 231N when you don’t need your instance anymore, release the static IP address because Google charges a small fee for unused static IPs (according to this page).
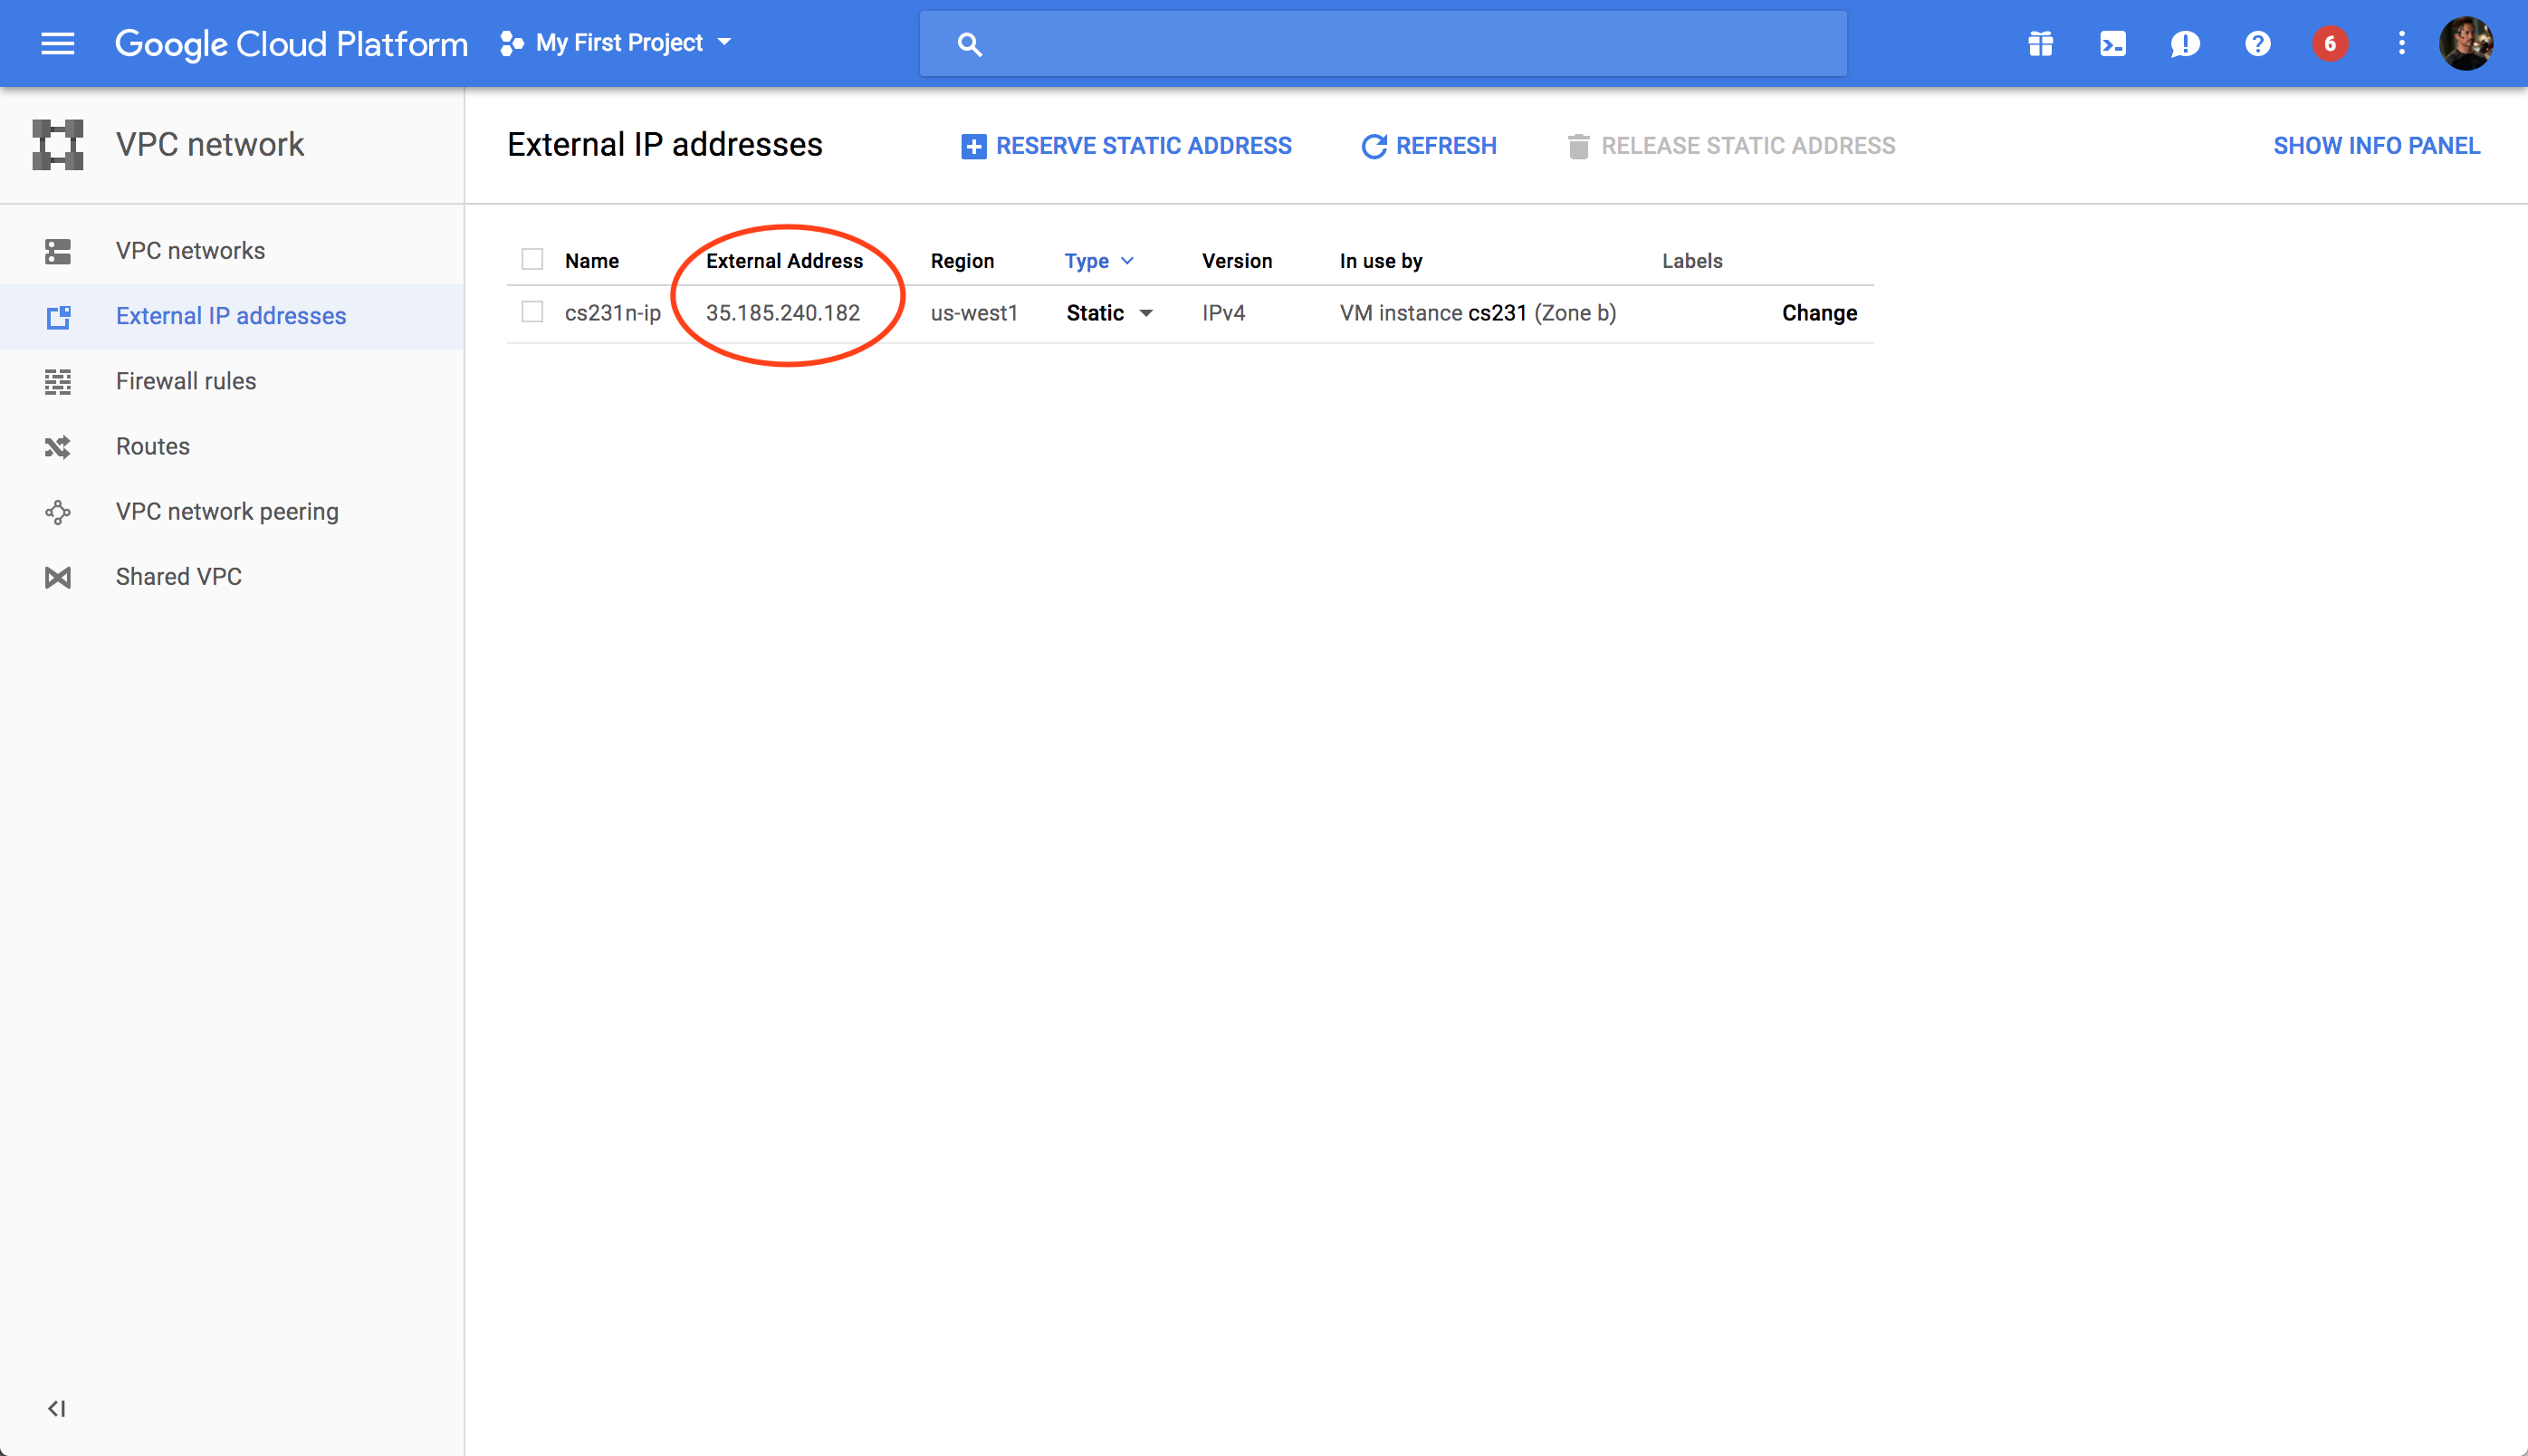
Take note of your Static IP address (circled on the screenshot below). We use 35.185.240.182 for this tutorial.
Launching and connecting to Jupyter Notebook
After you ssh into your VM using the prior instructions, run Jupyter notebook from the folder with your assignment files.
jupyter notebook
The default port is 8888, specified in ~/.jupyter/jupyter_notebook_config.py.
You can connect to your Jupyter session from your personal laptop. Open any browser and visit 35.185.240.182:8888. The login password is the one you set with the setup script above.
Getting Assignment 1 Ready
To start working on assignment1, we need to download some files and datasets. Run the following script from inside the instance:
conda install -c anaconda -y scipy=1.2.1 # we need to downgrade
wget http://cs231n.github.io/assignments/2019/spring1819_assignment1.zip
unzip spring1819_assignment1.zip
cd assignment1
cd cs231n/datasets
./get_datasets.sh
cd ../..
The script downgrades scipy (a Python scientific library) to version 1.2.1 due to a recent update breaking the course code. It also downloads assignment1 code and unzips it to /home/$USER/assignment1/, as well as download the CIFAF10 dataset.
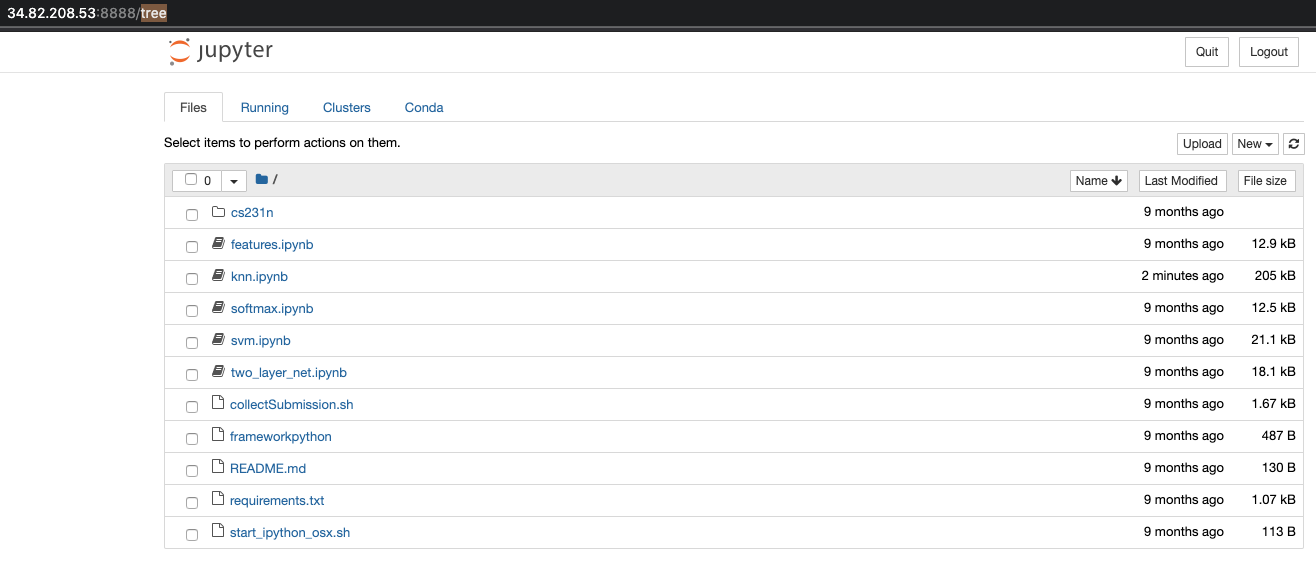
If you run pwd you should see that you are at /user/$HOME/assignment1 now. You can run jupyter notebook now and start workingon the assignment from your browser. Note that the command will tell you which port to use - the default is 8888:
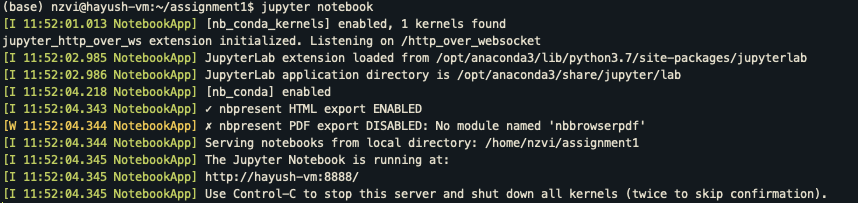
The Jupyter notebook - ran from your browser - would like this:
Submission: Transferring Files From Your Instance To Your Computer
We will not really need this in our own version of the course - there is no assignment submission system. Still, you will definitely want to transfer files between your computer and the instance, so read carefully.
When you are done with your assignments, run the submission script in your assignment folder to make a zip file. Please refer to specific instructions for each assignment.
Once you create the zip file, e.g. assignment1.zip, you will transfer the file from GCE instance to your local laptop. There is an easy command for this purpose:
gcloud compute scp <user>@<instance-name>:/path/to/assignment1.zip /local/path
For example, to download files from our instance to the current folder:
gcloud compute scp tonystark@cs231:/home/shared/assignment1.zip .
The transfer works in both directions. To upload a file to GCE:
gcloud compute scp /my/local/file tonystark@cs231:/home/shared/
Another (perhaps easier) option proposed by a student is to directly download the zip file from Jupyter. After running the submission script and creating assignment1.zip, you can download that file directly from Jupyter. To do this, go to Jupyter Notebook and click on the zip file, which will be downloaded to your local computer.
BIG REMINDER: Make sure you stop your instances!
Don’t forget to stop your instance when you are done (by clicking on the stop button at the top of the page showing your instances). You can restart your instance and the downloaded software will still be available.
We have seen students who left their instances running for many days and ran out of credits. You will be charged per hour when your instance is running. This includes code development time. We encourage you to read up on Google Cloud, regularly keep track of your credits and not solely rely on our tutorials.