We will install the required drivers for using GPUs for training deep models. But before we begin, remember:
When you are not using an instance - stop it
Now that we are done with this, let’s SSH into our machine like we learned in the previous guide.
Setting Up a GPU-Instance
Our instances should at this point be GPU-less. This saves a big chunk of money and allows you to keep the credits Google was nice enough to give you for the final project.
A Word on GPUs
For those of you not familiar - these are basically the drivers required for using GPUs (Graphical Processing Units - sometimes in this context also called GPGPUs where the other GP stands for General Purpose). Installing them is a lot of fun.
Types of GPUs
Not all GPUs are created equal. We are using us-west-b1 since that zone contains K80 GPUs - long gone fone other zones - which are powerful enough but are relatively very cheap. Newer P100 and V100 GPUs are way stronger but are also more expensive. Experiment with them when doing time crucial tasks such as training very deep models from scratch.
Adding a GPU to Your Instances
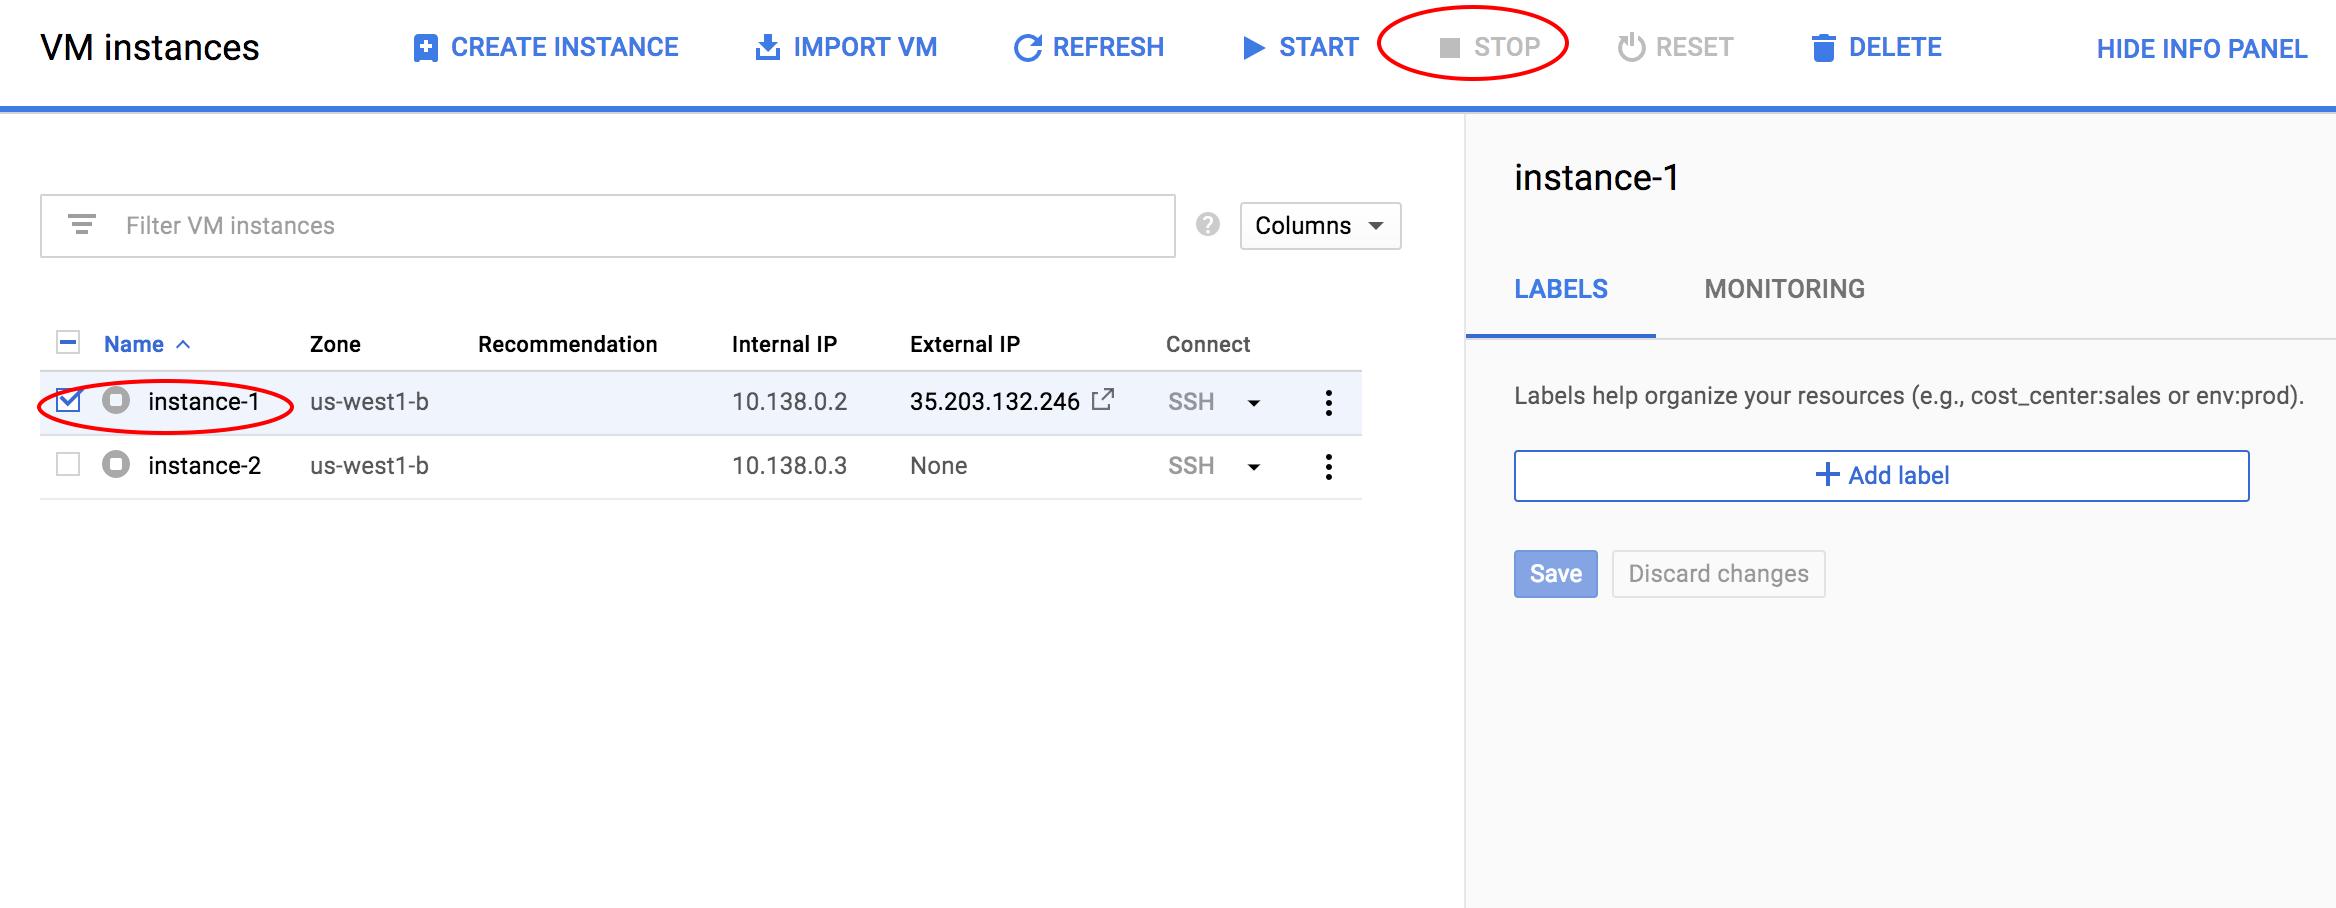
To do this, we will head into the dashboard and stop our running instance as below:
-
 -
-
Editing an Instance
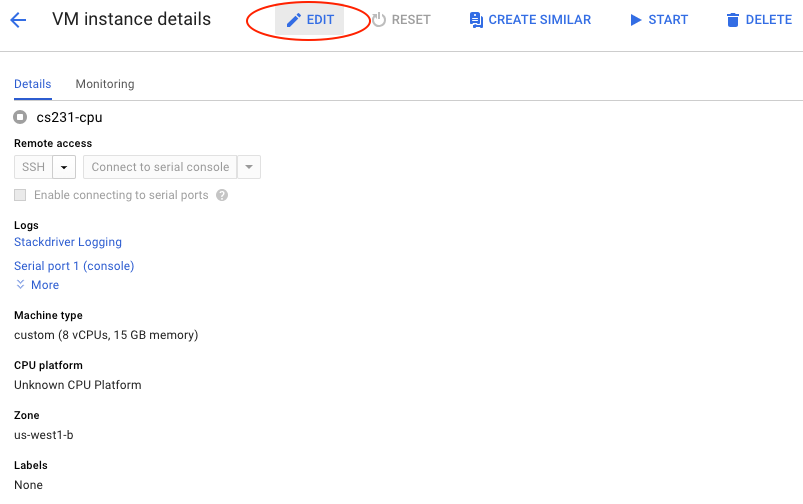
The nice feature of GCP is that is allows us to edit instances. By hitting Edit we can get into the same menu we used to define our instance when creating it.
-
 -
-
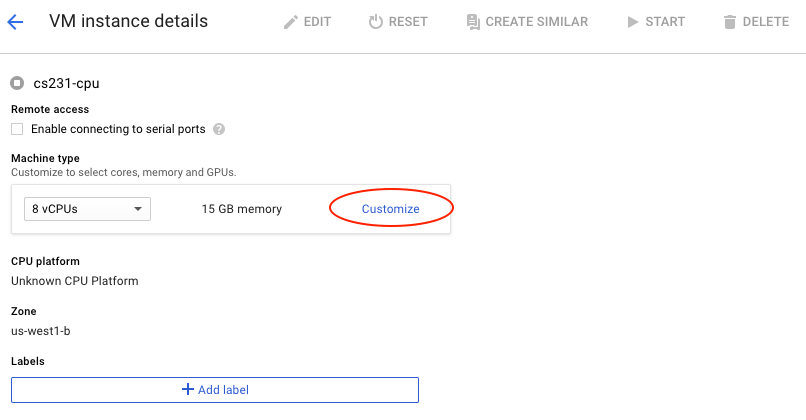
Inside the Edit menu, hit Customize
-
 -
-
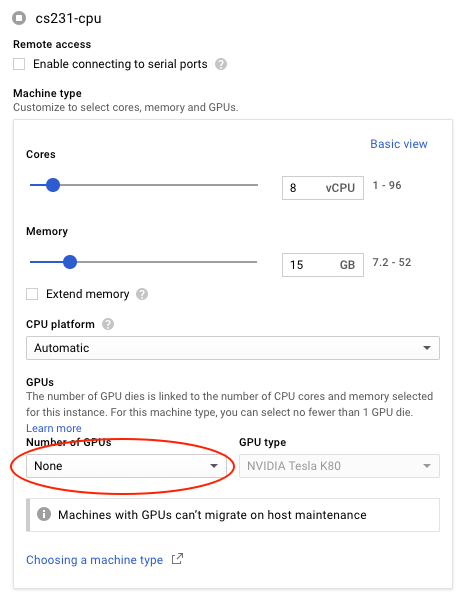
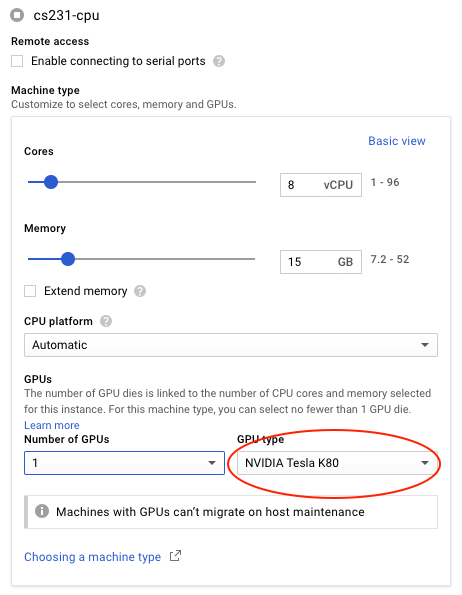
…and inside that menu, change Number of GPUs from None to 1. In GPU type change to K80 as below. Note that you have other options there - such as P100 and V100 as discussed before.
-
 -
-
-
 -
-
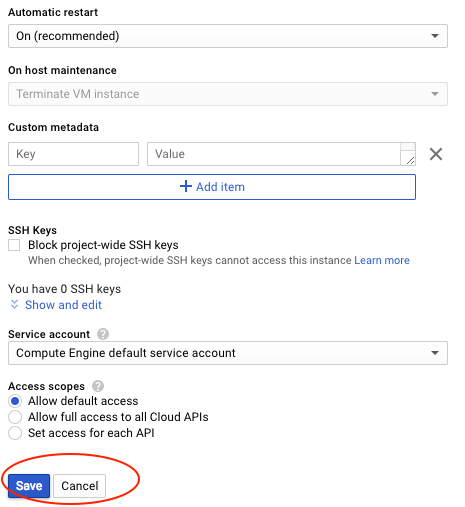
Finally, scroll all the way down and hit Save. Back at the instances dashboard, choose your instance and hit Start.
-
 -
-
Moving Forward
Don’t forget to change it back to a CPU instance by reversing this process once we’re done installing everything. Deep learning frameworks installed with GPU-support will work flawlessly even when the GPUs are removed from the instance. The oposite isn’t true.
Install CUDA and cuDNN
Installing CUDA
Let’s first make sure we don’t have an older version installed by hitting sudo apt-get purge nvidia* cuda*
Also do this just in case:
sudo apt-get autoremove
Some prerequisites:
sudo apt-get update -y && \
sudo apt-get install -y build-essential git gcc-multilib && \
sudo apt-get install -y linux-headers-$(uname -r)
sudo apt-get install build-essential gcc-multilib dkms
Install NVIDIA Drivers
CUDA and NVIDIA drivers are actually two different things. CUDA packages usually contain an older version of the drivers, so it’s best to install the two separately. Note that we will be installing version 410. Installing NVIDIA drivers can be done like this:
wget http://us.download.nvidia.com/XFree86/Linux-x86_64/410.73/NVIDIA-Linux-x86_64-410.73.run && \
chmod +x NVIDIA-Linux-x86_64-*.run && \
sudo ./NVIDIA-Linux-x86_64-*.run -s && \
rm -rf ./NVIDIA-Linux-x86_64-*.run
Test this:
Do this to list all available devices:
nvidia-smi -q | head && ls -la /dev | grep nvidia
If for some reason this fails, do
sudo modprobe nvidia
and try again. Now let’s install CUDA:
Install CUDA 9.2
For this guide we will use the stable CUDA-9.2 which works with the latest TF/PyTorch versions. CUDA-10 is out now but isn’t fully supported by the latest frameworks. Once it is, installing a newer version should be straightforward from this guide.
Again, we don’t use the deb installation but rather the runfile one. It simply extracts files into /usr/local/cuda-
The CUDA runfile installer can be downloaded from NVIDIA’s websie. But what you download is a package the following three components:
- an NVIDIA driver installer, but usually of stale version;
- the actual CUDA installer;
- the CUDA samples installer;
wget https://developer.nvidia.com/compute/cuda/9.2/Prod2/local_installers/cuda_9.2.148_396.37_linux && \
chmod +x cuda_* && \
mkdir nvidia && \
./cuda_*linux -extract=`pwd`/nvidia && \
cd nvidia && \
sudo ./cuda-linux*.run -noprompt && \
cd .. && rm -rf nvidia && \
rm cuda_*linux
For this type of installation it’s best to manually add the required binaries to PATH by:
echo "export PATH=\$PATH:/usr/local/cuda-9.2/bin" >> ~/.bashrc && \
echo "export LD_LIBRARY_PATH=\$LD_LIBRARY_PATH:/usr/local/cuda-9.2/lib64" >> ~/.bashrc && \
source ~/.bashrc
We should be done now! To check that this worked, let’s invoke:
nvcc --version
Which should output:
>>> nvcc: NVIDIA (R) Cuda compiler driver
>>> Copyright (c) 2005-2018 NVIDIA Corporation
>>> Built on Tue_Jun_12_23:07:04_CDT_2018
>>> Cuda compilation tools, release 9.2, V9.2.148
Install cuDNN
(New!) Download cuDNN
Download this file and locate it in the home dir of your instance:
wget https://storage.googleapis.com/cs231n-il/cudnn-9.2-linux-x64-v7.4.1.5.tgz
(Conditional) Register to NVIDIA Developer Forums
cuDNN, unlike CUDA, requires us to register with NVIDIA’s developer center. Let’s do that by going here. Once done, download the correct cuDNN distribution. Note that for this guide, we want to get version 7.4.1 and nothing earlier or later. Archived versions are in this link.
We want to download Download cuDNN v7.4.1 (Nov 8, 2018), for CUDA 9.2. This might work directly, again. The file we want will always be called cuDNN Library for Linux (and not the ones with Deb). Download it and place in your homedir inside the machine. For version 7.4.1 it will be called cudnn-9.2-linux-x64-v7.4.1.5.tgz. Since you must register to download it, you will most likely have to move it from your computer to the remote machine.
gcloud compute scp --recurse \
	Downloads/cudnn-9.2-linux-x64-v7.4.1.5.tgz instance-01:~/
Now Install
From your homedir invoke the following. This extracts the cuDNN binaries to the cuda-9.2 directory.
sudo tar xvf cudnn-9.2-linux-x64-v7.4.1.5.tgz --strip-components=1 -C /usr/local/cuda-9.2/
Installing Deep Learning Libraries
It is up to you to decide what libraries you might want to use in this course. We direct you to follow the instructions on both websites for PyTorch and TensorFlow, but read the next part first.
Anaconda and Miniconda
Starting Assignment 2 we believe it’s better to use Anaconda for managing python environments and packages. For assignment one we used a simple virtualenv but it’s not a recommended option for heavier projects.
Like virtualenv, Anaconda is a package manger and a virtual environemnt manager packed into one. This means that it has a very rich collection of Python libraries already compiled. It also means it allows you to run standalone environments, possibly with different versions of those libraries. It has become the de-facto standard in the ML/DS industry.
We direct you to the Anaconda website, where you can follow instructions to get your system up and running. Follow instructions for Ubuntu systems. Once done, we recommend installing the PyTorch or Tensorflow using the Anaconda installation method.
We will actually be installing miniconda which contains a smaller number of pre-installed packages.
After reading the instructions you can actually follow ours :-)
wget https://repo.continuum.io/miniconda/Miniconda3-latest-Linux-x86_64.sh && \
bash Miniconda3-latest-Linux-x86_64.sh -b -p $HOME/miniconda3 && \
echo "export PATH=$HOME/miniconda3/bin:\$PATH" >> ~/.bashrc && \
source ~/.bashrc
Once anaconda is actually installed, we can create a new environment using:
conda create --yes -n cs231n python=3.6 anaconda
To activate or exit/deactivate an environment, we will use
source activate cs231n
…and
deactivate cs231n
respectively.
To install a specific TF or PyTorch version we can specify them in the installer once inside an environment. Make sure you are inside the environment!.
conda install --yes -c pytorch pytorch=0.4.1
Note that the first pytorch directs Anaconda to use a specific channel.
For TF, use:
conda install --yes -c anaconda tensorflow-gpu=1.8.0
(on a non-GPU machine you’ll have to drop the -gpu)
Test Insallation
With TF, invoking the following test code(s) inside a Python shell should make sure you are fine.
import tensorflow as tf


class SquareTest(tf.test.TestCase):
  def testSquare(self):
    with self.test_session():
      x = tf.square([2, 3])
      self.assertAllEqual(x.eval(), [4, 9])


if __name__ == '__main__':
  tf.test.main()
For testing GPU TF, do:
import tensorflow as tf
with tf.device('/gpu:0'):
    a = tf.constant([1.0, 2.0, 3.0, 4.0, 5.0, 6.0], shape=[2, 3], name='a')
    b = tf.constant([1.0, 2.0, 3.0, 4.0, 5.0, 6.0], shape=[3, 2], name='b')
    c = tf.matmul(a, b)

with tf.Session() as sess:
    print (sess.run(c))
For PyTorch, try this:
from __future__ import print_function
import torch
x = torch.rand(5, 3)
print(x)
To test that PyTorch is seeing installed GPUs, you can simply:
torch.cuda.get_device_name(0)
Assuming this worked, our environment is now ready!
Working with Conda
During the course, especially the project part, there’s a high chance you’ll be needing all sorts of external libraries. Those almost always exist in some pip format. Pip is Python’s native package manager (actually called PyPi).
Anaconda, as we mentioned, has it’s own package management system which has better tracking of version dependencies. Always look for a Conda version before using pip install <...>. In most cases simply hitting conda install instead will work out of the box.
Some Extra Packages
I’d recommend also installing OpenCV. It’s the industry standard for working with images (although assignment 1 actually depended on the simpler, older PIL). To install:
conda install --yes -c conda-forge opencv==3.4.3
Getting the hang of it?